
Can You Iron DTF Transfers? The Professional Guide to Home Application
Most creators think a $5,000 heat press is the only entry point for retail-quality apparel, but the truth is your standard home iron can deliver industrial-grade results if you master the physics of the press. You've likely asked yourself, can you iron DTF transfers without the design cracking or peeling off after the first wash? It's a common frustration. You've spent money on premium blanks and professional transfers, only to end up with a ruined garment because the heat was uneven or the pressure was insufficient. MoreTranz has already empowered over 14,000 creators to overcome these technical hurdles and produce high-impact results with the tools they already own.
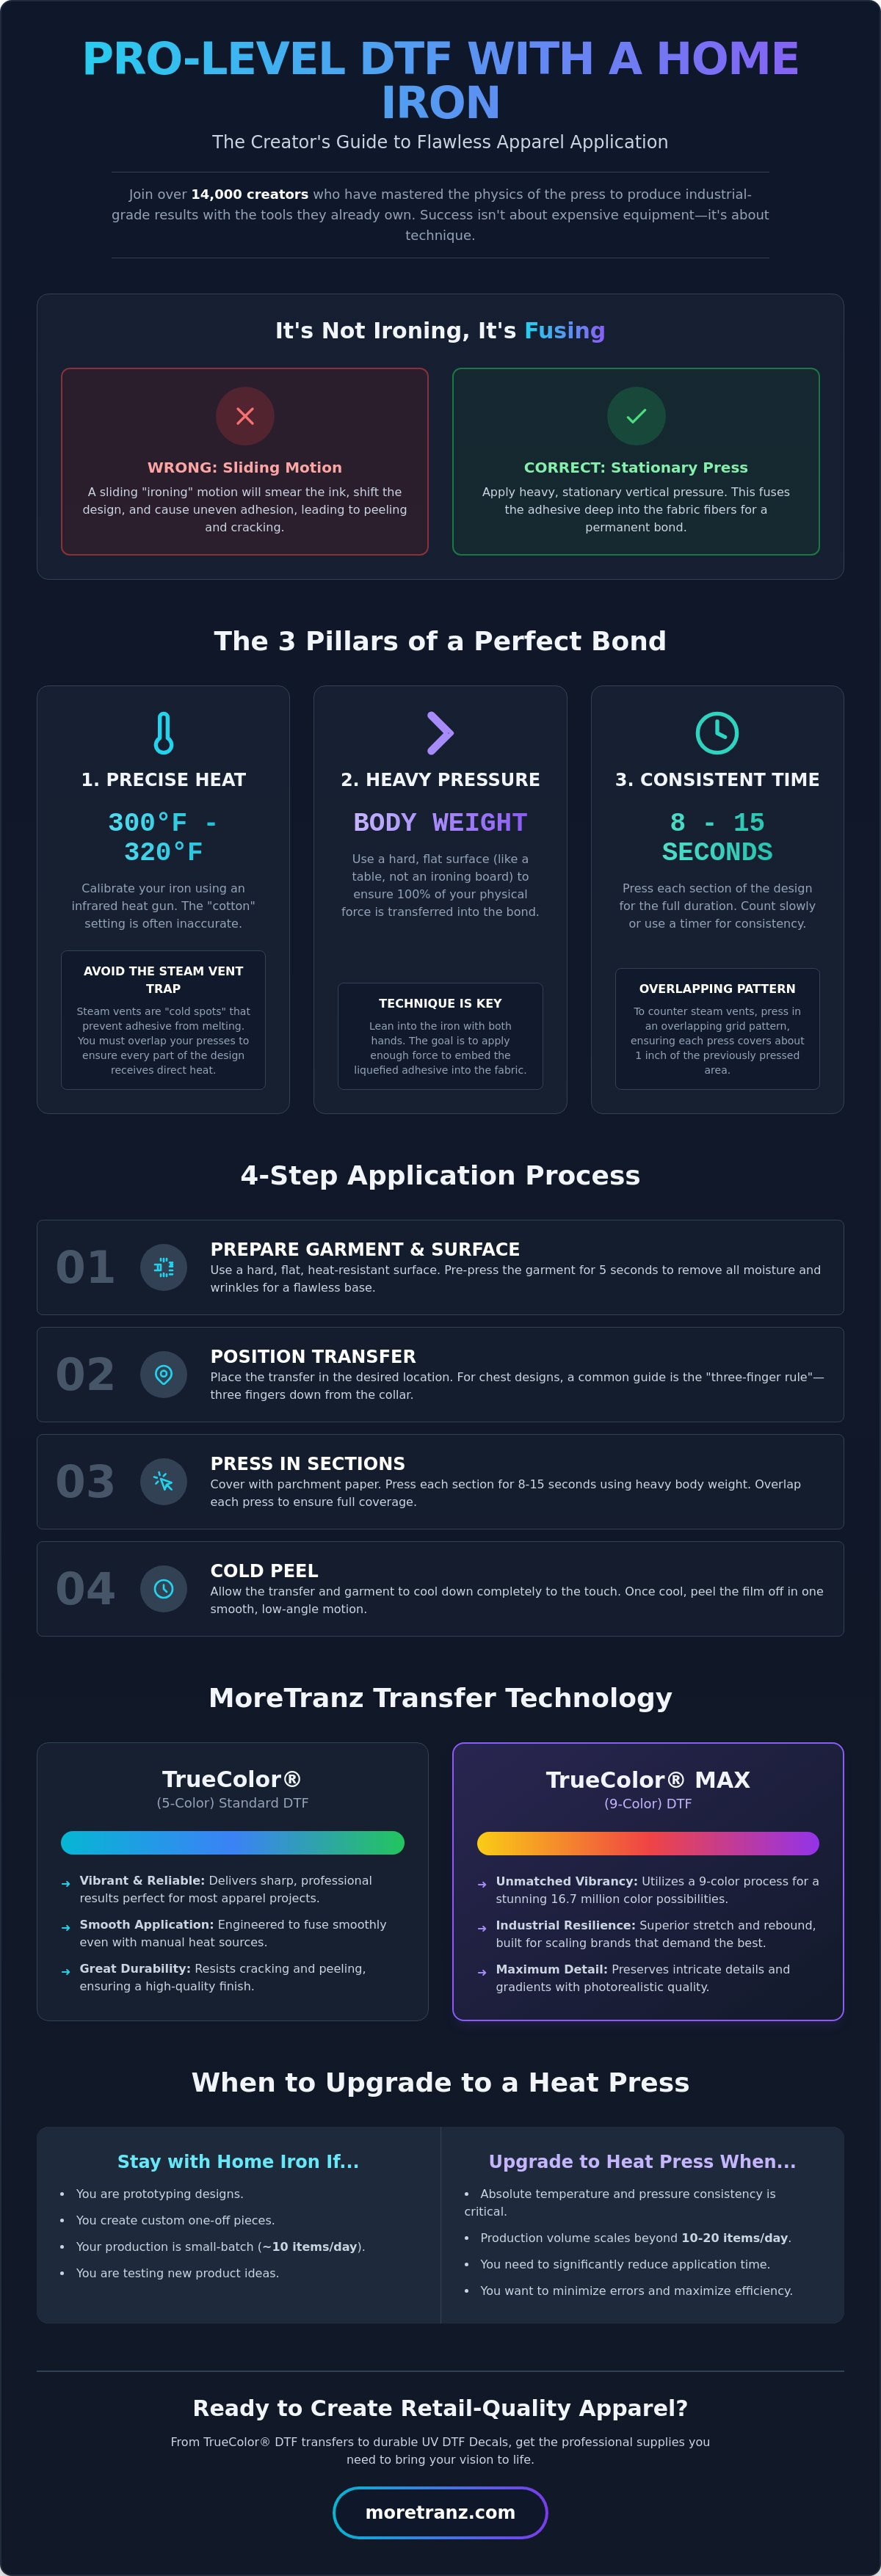
You don't need a massive equipment budget to start scaling your business today. This guide provides the technical roadmap to applying TrueColor® (5-Color) Standard DTF and TrueColor® MAX (9-Color) DTF products using a standard home setup. We'll break down the specific manual pressure techniques, temperature calibrations, and cooling cycles required to achieve a permanent, vibrant bond. You'll gain the confidence to execute professional-grade applications on apparel and UV DTF Decals, ensuring every piece you create is durable, retail-ready, and built to last.
Key Takeaways
- Master the manual pressure techniques that prove can you iron DTF transfers while maintaining retail-ready durability.
- Learn to navigate the "Steam Vent Trap" and calibrate standard irons to the critical 300°F to 320°F temperature threshold.
- Implement the three-finger alignment rule and pre-pressing protocols to eliminate moisture and ensure flawless design placement.
- Discover why TrueColor® MAX (9-Color) DTF transfers provide the superior vibrancy and industrial resilience needed for scaling brands.
- Identify the specific production volume milestones that signal when to transition from home application to a professional heat press workflow.
Can You Iron DTF Transfers? The Definitive Answer for Creators
The short answer is yes; you can iron DTF transfers with professional results. While industrial heat presses provide the most automation, they aren't the only way to achieve a retail-ready finish. MoreTranz has supported over 14,000 creators who utilize home irons for prototyping, custom one-offs, and small-batch production runs. Success doesn't depend on the price of your equipment, but on your ability to control the technical variables of the application. You aren't just smoothing out wrinkles; you're executing a precise thermal bond that requires consistent heat and heavy, stationary pressure.
To visualize the manual application process and see how a standard iron performs in a real-world scenario, watch this technical breakdown:
The Science of the DTF Bond
Understanding the Direct-to-film (DTF) printing process is critical for home users. The back of every transfer is coated in a specialized TPU (Thermoplastic Polyurethane) adhesive powder. When this powder hits its melting point, typically between 275 and 300 degrees Fahrenheit, it transitions from a solid to a liquid state. Our TrueColor® (5-Color) Standard DTF transfers are engineered to facilitate this transition smoothly even with manual heat sources. The chemical bond is a thermal fusion where the liquefied TPU encapsulates the fabric fibers to create a permanent, flexible, and high-resolution shield that resists cracking.
Iron vs. Heat Press: Setting Expectations
You must shift your mindset from "ironing" to "pressing." Standard ironing involves a sliding motion to remove wrinkles, but sliding a hot iron over a DTF film will cause the design to shift or smear. You need to apply vertical, stationary force. A home iron is essentially a manual heat press with a smaller surface area. This means you have to press the design in sections, ensuring every square inch receives the same 8-15 seconds of intense pressure.
Consistency starts with your work surface. Never use a standard padded ironing board because the soft padding absorbs your physical force, preventing the adhesive from sinking deep into the garment fibers. Instead, use a hard, flat surface like a wooden table or a stone countertop protected by a thin silicone mat. This ensures 100% of your body weight is transferred directly into the bond. If you're working with various transfer types, this rigid setup is the only way to guarantee your designs survive the wash test.
Heat, Pressure, and Timing: The Physics of Home Iron Application
Applying a professional-grade transfer with a household tool requires a shift from domestic chore to industrial application. When creators ask can you iron DTF transfers, they often overlook the specific physics of the tool in their hand. Most home irons are designed with steam vents to facilitate fabric softening. These vents create literal "cold spots" where no heat reaches the film. If your iron plate is 40% holes, then 40% of your transfer isn't receiving the thermal energy required to activate the adhesive. This leads to inconsistent peeling and designs that flake off after a single wash cycle because the TPU powder never fully liquefied.
Calibration is your next technical hurdle. A "cotton" setting on one brand might be 350°F, while another barely hits 280°F. You need a consistent sweet spot between 300°F and 320°F to ensure the bond is permanent. To achieve this precision, use an infrared heat gun to measure the actual temperature of the iron faceplate before it touches the garment. If you're using a TrueColor® MAX (9-Color) DTF product, that temperature accuracy is what preserves the 16.7 million color possibilities and ensures industrial-strength durability across the entire design surface.
Overcoming the Steam Vent Limitation
To defeat the steam vent trap, you must use an overlapping press pattern. Never slide the iron across the film like you're pressing a dress shirt. Sliding is the primary cause of distorted prints and blurred edges. Instead, press down firmly for 12 to 15 seconds, lift the iron completely, and move it half an inch to overlap the previous spot. This ensures the solid parts of the iron plate eventually cover the areas previously positioned under a vent. Before you start, you must empty every drop of water from the reservoir and turn off all steam settings. Even a tiny burst of moisture can ruin the chemical bond between the ink and the fabric fibers.
Calculating Manual Pressure
Professional heat presses operate at a heavy pressure of 8 to 9 PSI. To replicate this with a home iron, you need to use your full body weight effectively. Stand directly over your workspace and use a two-hand technique, placing one hand on the handle and the other on the front of the iron for maximum downward force. This is why a standard ironing board is your enemy. The metal mesh and foam padding will flex under your weight, dissipating the pressure. Use a solid wooden table or a stone countertop. Protect the surface with a thin cotton cloth to ensure 100% of your energy is focused on the transfer. If you want to test your technique before committing to a big project, grab a MoreTranz sample pack to dial in your home setup and join the 14,000 creators already producing high-performance apparel.
Step-by-Step: How to Apply TrueColor® DTF Transfers with a Home Iron
Precision execution separates a hobbyist project from a commercial product. When asking can you iron DTF transfers, the answer rests in your workflow discipline. MoreTranz has standardized this sequence for over 14,000 creators to ensure every TrueColor® (5-Color) Standard DTF application rivals industrial output. Start by pre-pressing your garment for 5 seconds. This isn't just for wrinkles; it's a critical moisture-evacuation step. Trapped water vapor is the leading cause of premature adhesive failure. Once the fabric is dry and flat, use the three-finger rule. Place the top of your design three fingers below the collar for a standard chest placement. This ensures consistent alignment across your entire production run.
The Perfect Press Sequence
Follow this rigid protocol to ensure a total thermal bond. First, pre-heat the garment for 5 seconds to eliminate residual moisture. Next, position your transfer and press each section of the design for 15 to 20 seconds. Apply maximum downward force using the two-hand technique. If the design is larger than your iron plate, move in a deliberate grid, overlapping each press by half an inch to eliminate cold spots. Finally, allow the film to cool until it's warm to the touch. While some professional films allow for hot peeling, a warm-state release is significantly safer for home iron users. It gives the adhesive a moment to set, preventing lifting during the peel.
Post-Press Finishing for Retail Quality
The job isn't finished when the film comes off. A secondary 10-second seal press is mandatory for professional results. Cover the exposed design with parchment paper or a Teflon sheet and press again with high pressure. This step drives the ink deeper into the textile fibers, shifting the texture from a plastic hand feel to a soft, fabric-integrated finish. This second press is what allows TrueColor® MAX (9-Color) DTF transfers to withstand 50+ wash cycles without fading. Crucially, wait a full 24 hours before the first wash. This window allows the chemical bond to fully cure and stabilize against the mechanical stress of a washing machine. This disciplined approach ensures your brand's impact remains permanent, whether you're producing apparel or applying UV DTF Decals.
Home Iron vs. Professional Heat Press: When to Upgrade Your Workflow
While we've established that you can iron DTF transfers with high success, every growing brand eventually hits a production ceiling. A home iron is a bridge; it’s an agile tool for the startup phase. However, when your order volume shifts from occasional gifts to a consistent daily queue, the manual labor of a household iron becomes a liability. MoreTranz has watched 14,000 creators navigate this exact transition. The upgrade to a professional heat press isn't just about luxury; it’s about protecting your brand reputation and your hourly profit. Consistency is the foundation of customer loyalty. If one shirt in a batch of ten peels because of a manual error, you haven't just lost a sale; you've lost a client.
Productivity Metrics for Growing Brands
Time is your most expensive resource. A manual application with a home iron takes approximately 2 minutes per garment when you account for the multiple overlapping presses, cooling time, and the mandatory finishing press. In contrast, an industrial heat press completes the same bond in 15 seconds of active time. When you scale to a 50-shirt order, that’s the difference between 100 minutes of back-breaking labor and 12 minutes of efficient workflow. Beyond speed, the heat press eliminates the risk of "re-dos." One cold spot from a steam vent can ruin a blank garment, instantly eating your profit margins. To maximize your output quality during this growth phase, check out our TrueColor MAX DTF Transfers for the highest color density and industrial resilience. This TrueColor® MAX (9-Color) DTF technology ensures that your designs remain vibrant and sharp, regardless of the application method used.
Technical Advantages of Industrial Equipment
Precision is the hallmark of professional equipment. Industrial presses offer edge-to-edge heat consistency and digital pressure gauges that remove the guesswork from every application. This stability is vital when handling complex materials like Spangle Transfers or when you're executing high-volume runs using DTF Gang Sheets. While your home iron can handle standard cotton tees with TrueColor® (5-Color) Standard DTF transfers, an industrial press allows you to expand into difficult synthetics and heavy hoodies where deep adhesive penetration is non-negotiable. This equipment also streamlines your workflow for non-apparel items like UV DTF Decals, where surface preparation and pressure are equally critical. If you're ready to stop prototyping and start producing at scale, explore the full range of MoreTranz professional transfers to see how industrial-grade inputs transform your final product and accelerate your path to market dominance.
Beyond the Iron: Maximizing Durability with MoreTranz Professional Transfers
Technical mastery of the iron is only half the battle. The ultimate success of your garment depends on the chemistry of the film and the quality of the adhesive powder. You can have the most precise manual technique in the world, but if you're using low-grade transfers, the bond will fail. MoreTranz provides the industrial foundation for over 14,000 creators who need to produce retail-ready apparel without a five-figure equipment budget. When you ask can you iron DTF transfers, the answer is a resounding yes, provided you are starting with a professional-grade toolkit. We don't just supply film; we offer a full suite of facilitator tools, including background removal and vector conversion services, to ensure your digital files are as sharp as your final output.
TrueColor® MAX: The Gold Standard for Home Users
The TrueColor® MAX (9-Color) DTF system represents the peak of modern transfer technology. While standard 5-color prints are effective for basic logos, our 9-color process unlocks over 16.7 million color possibilities. This allows for hyper-realistic skin tones and complex gradients that standard market alternatives simply cannot replicate. For the home user, the advantage is in the adhesive. Our premium TPU powder is engineered for high-performance bonding even under the manual pressure of a household iron. MoreTranz transfers are chemically formulated to achieve a permanent, flexible fusion that maintains its visual intensity and structural integrity through more than 50 industrial wash cycles when applied correctly. This industrial-grade resilience is what separates a professional brand from a temporary hobbyist project.
Getting Started with a MoreTranz Sample Pack
Precision execution requires empirical data. Every home iron has a unique thermal profile, and every fabric blend reacts differently to manual force. Before you commit to a major production run, you must calibrate your setup. Use the MoreTranz Sample Pack to run wash tests on your specific blanks. This allows you to dial in your temperature and timing without risking expensive inventory. Once you've perfected your home press technique, you can instantly scale your workflow by utilizing our wholesale DTF gang sheets. These sheets allow you to maximize your surface area and minimize your per-unit cost. Whether you are building an apparel line or expanding into hard-surface branding with UV DTF Decals, the path to market dominance starts with professional-grade materials. Join a community that values technological dominance and refuses to compromise on the durability of their brand.
Scale Your Production with Professional Precision
You now have the technical roadmap to bridge the gap between hobbyist DIY and professional manufacturing. Success with a home iron isn't about luck; it's about mastering the physics of thermal bonding through stationary pressure and precise heat calibration. We've established that the question isn't just can you iron DTF transfers, but how you can execute that press to meet retail standards. By prioritizing the 24-hour curing window and utilizing a rigid work surface, you ensure your designs survive the wash test and maintain their visual impact.
MoreTranz is your high-performance partner in this journey. We empower 14,000 creators with our proprietary TrueColor® MAX (9-Color) DTF technology and no minimum orders for custom gang sheets. Whether you are applying vibrant apparel designs or durable UV DTF Decals, our toolkit is engineered for your success. Don't let equipment costs slow your momentum. Start testing your setup today and experience the difference that industrial-grade materials make in your final product.
Order your MoreTranz Sample Pack today and test our TrueColor® quality!
Your home setup is no longer a limitation. It's your launchpad for a dominant brand.
Frequently Asked Questions
What temperature should my iron be for DTF transfers?
Your iron should be calibrated between 300°F and 320°F for a successful bond. Since most household irons lack digital readouts, you should use the "Cotton" or "Linen" setting and verify the plate temperature with an infrared heat gun. This precise range ensures the TPU adhesive on your TrueColor® (5-Color) Standard DTF transfer reaches its melting point without scorching the garment fibers.
Can I use a steam iron for DTF application?
You can use a steam iron, but you must empty the water reservoir completely and deactivate all steam functions before starting. Steam vents create significant cold spots on the faceplate that prevent a uniform adhesive bond. When creators ask can you iron DTF transfers, the primary risk is usually these vents, which is why an overlapping press technique is mandatory for total coverage.
Why is my DTF transfer peeling off after ironing?
Peeling is almost always the result of insufficient physical pressure or residual moisture trapped in the fabric. If you used a padded ironing board instead of a hard, flat surface, the adhesive didn't sink deep enough into the textile. Ensure you're using your full body weight and always pre-press the garment for 5 seconds to evacuate moisture before positioning your transfer.
Do I need parchment paper to iron on DTF transfers?
You need parchment paper or a Teflon sheet specifically for the mandatory finishing press. After you peel the carrier film, covering the exposed design and pressing for an additional 10 seconds locks the ink into the fabric. This secondary step is what creates the soft, retail-quality hand feel that 14,000 creators at MoreTranz rely on for their professional brands.
How long do I need to press the iron on the transfer?
Press the iron for 15 to 20 seconds on each specific section of the design. Because a home iron plate is smaller than most professional transfers, you must move in a stationary, overlapping grid pattern rather than a sliding motion. Lift the iron completely and reposition it to ensure every square inch receives the same high-intensity thermal energy and downward force.
Can I apply UV DTF Decals with a home iron?
No, you should never apply UV DTF Decals with a home iron. These are pressure-sensitive products that do not require heat to bond to hard surfaces. Applying heat to a UV decal will warp the specialized ink and destroy the adhesive layer. Use a squeegee and firm manual pressure to secure these decals to glass, metal, or plastic surfaces instead.
How do I wash a shirt that has an ironed-on DTF transfer?
Wash the garment in cold water with mild detergent and turn the shirt inside out to protect the design surface. Avoid using bleach or aggressive fabric softeners, as these chemicals can break down the adhesive bond over time. Crucially, wait a full 24 hours after the final press before the first wash cycle to allow the TrueColor® MAX (9-Color) DTF film to fully cure.
What is the best fabric for ironing on DTF transfers?
100% cotton and high-cotton blends are the most reliable fabrics for home iron application. These natural fibers are porous and absorb the liquefied TPU adhesive effectively, creating a permanent bond that resists cracking. While you can use synthetics like polyester, they require much more precise temperature control to avoid melting the fabric while you're trying to activate the transfer adhesive.