
DTF Transfer Application Instructions: The MoreTranz Master Guide (2026)
Most printers treat heat pressing like a guessing game, but when material costs account for 40% to 60% of your total production expense, "good enough" is a recipe for wasted profit. You've likely fought with adhesive halos or designs that crack after a single wash. It's a common pain point when your equipment settings don't align with the high ink density of professional film. Mastering your DTF transfer application instructions isn't just about sticking a label; it's about engineering a bond that outlasts the garment itself.
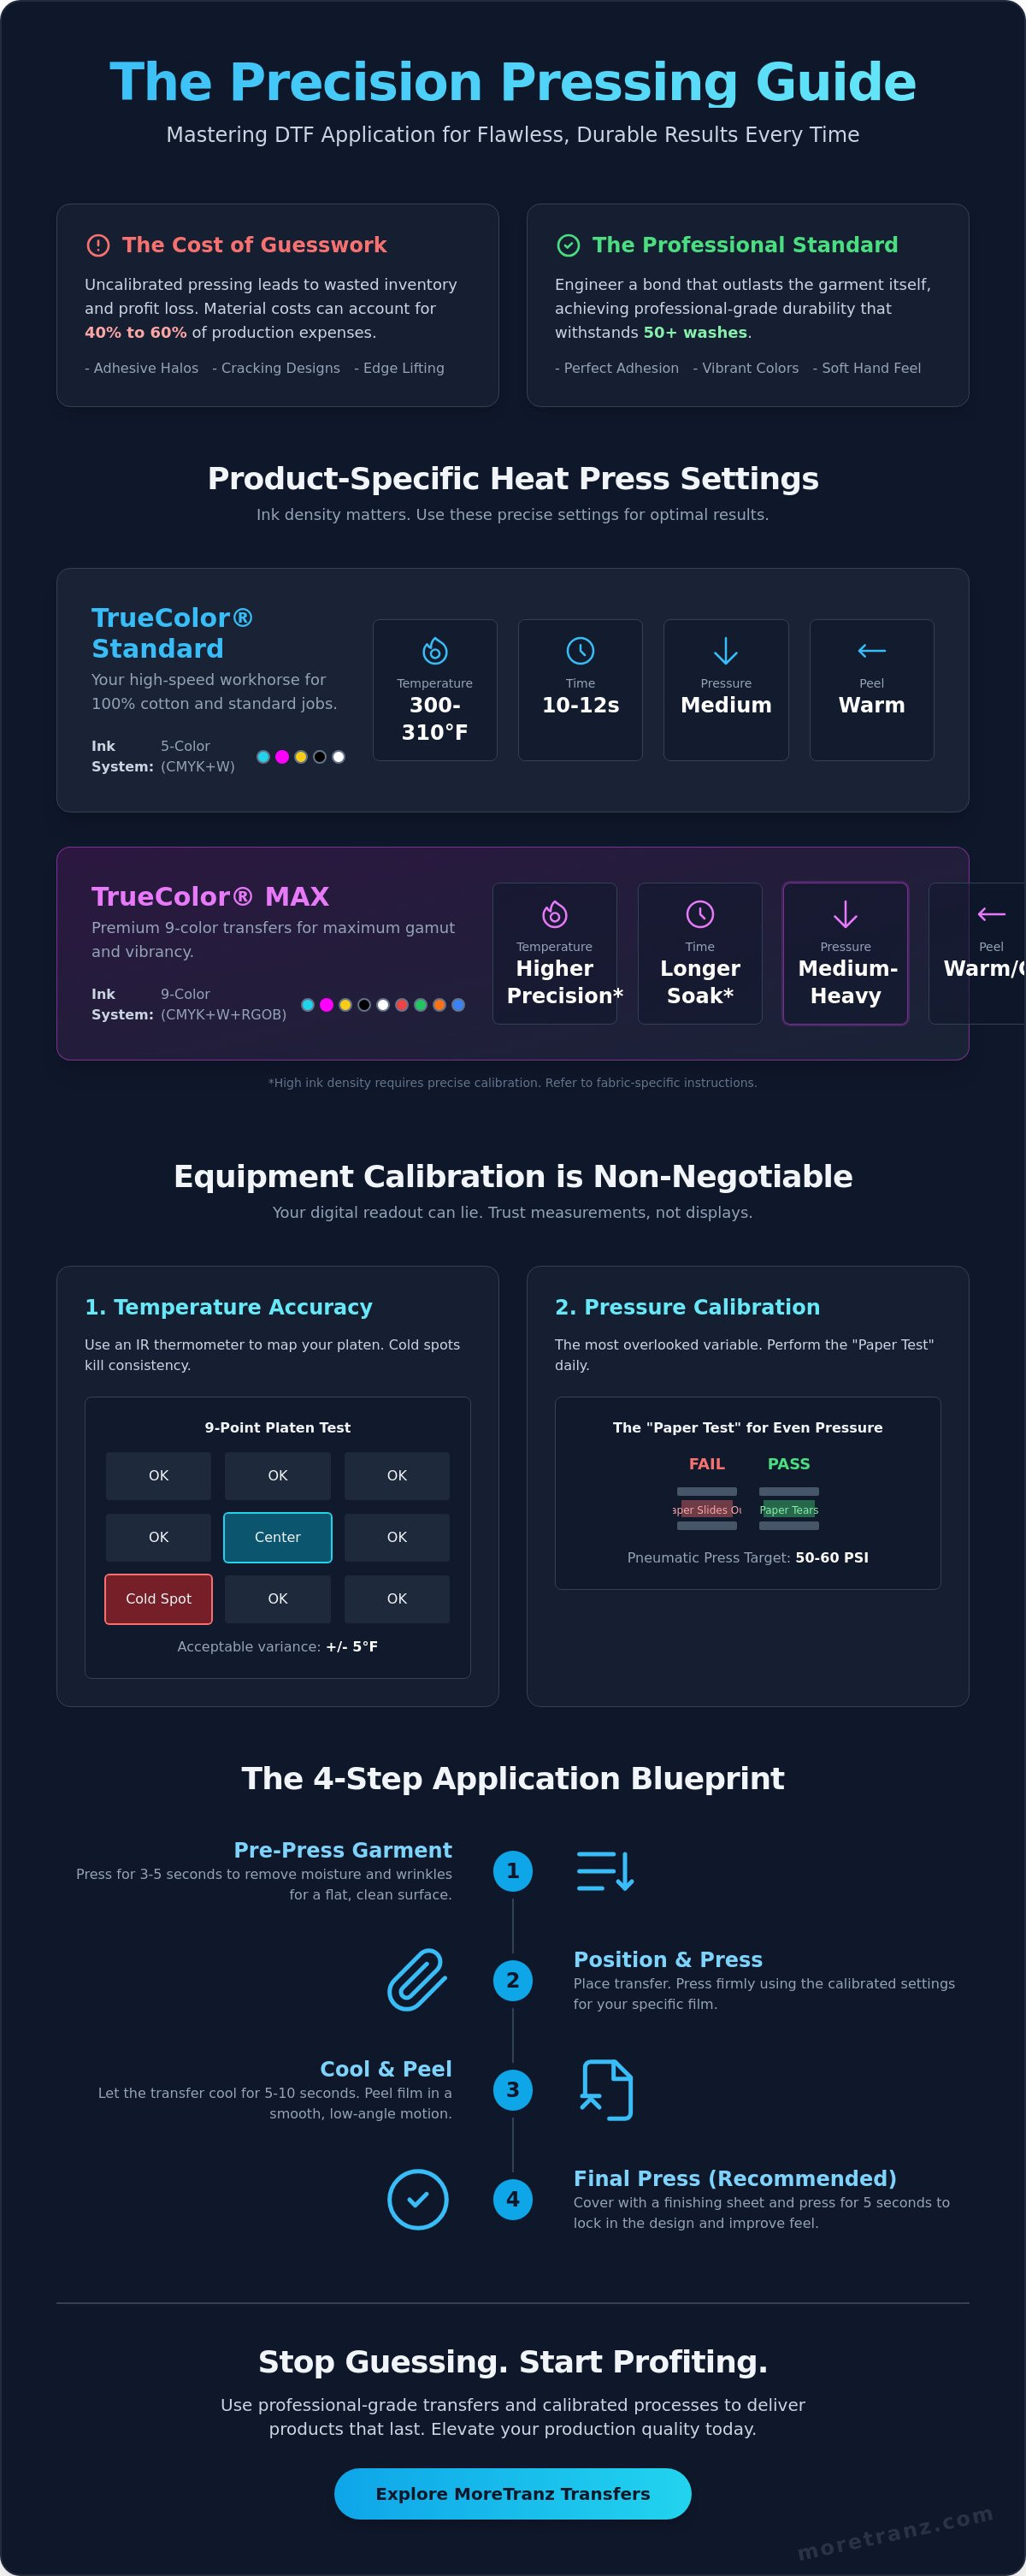
We're here to eliminate the variables. This guide provides the exact heat, pressure, and timing specs required to apply the TrueColor® (5-Color) Standard DTF product and the TrueColor® MAX premium (9-Color) DTF product with total confidence. You'll learn how to achieve professional-grade durability that withstands 50+ washes while staying compliant with 2026 textile regulations. We'll break down pressure calibration and the specific requirements of our unique 9-color output to ensure your MoreTranz production remains fast, bold, and profitable.
Key Takeaways
- Learn why your heat press digital readout might be lying and how to use the "Paper Test" to ensure perfectly even pressure distribution.
- Master specific DTF transfer application instructions for both TrueColor® (5-Color) Standard DTF products and the high-density ink loads of TrueColor® MAX premium (9-Color) transfers.
- Implement the "Pre-Press" ritual to eliminate moisture and wrinkles, ensuring a professional-grade bond that lasts 50+ washes.
- Optimize your settings for different substrates, from the gold standard of 100% cotton to heat-sensitive synthetics that require precise dye migration control.
- Identify the root causes of ghosting and edge lifting to stop wasting inventory on your high-volume production runs.
Mastering the Setup: Equipment Calibration for Professional Results
Digital readouts are often just suggestions. Your heat press might display 320°F, but the actual platen surface could be 300°F or 340°F. This discrepancy destroys consistency, especially when you're working with the high ink density of our TrueColor® MAX premium (9-Color) DTF product. Mastering your DTF transfer application instructions starts with the hardware. If you're new to the industry or need a refresher on what is Direct-to-Film (DTF) printing, understand that heat is the catalyst for the chemical bond between the adhesive and the fabric. Without accurate calibration, you're just guessing with your profit margins.
To better understand this concept, watch this helpful video:
Temperature Accuracy and IR Testing
Stop guessing and start measuring. Use an infrared (IR) thermometer to map your platen surface. Fire the IR gun at nine different points: the four corners, the midpoints of each side, and the center. An acceptable variance is within +/- 5 degrees. If you find "cold spots" larger than two inches, your heating element is failing. This mapping is vital for high-volume gang sheet production where designs are spread across the entire platen width. External factors like a drafty warehouse or high humidity can also sap heat from your lower platen, so calibrate your DTF transfer application instructions based on your specific environment.
The Critical Role of Pressure Calibration
Pressure is the most overlooked variable in the shop. For TrueColor® (5-Color) Standard DTF products, medium pressure is usually sufficient. However, the TrueColor® MAX premium (9-Color) DTF product requires "Medium-Heavy" pressure to force the increased ink load into the garment fibers. MoreTranz is trusted by over 5,000 creators because we prioritize this level of precision. If your pressure is off, even the best 9-color ink won't bond correctly.
Perform the "Paper Test" daily. Place a strip of paper at each corner and the front of the press. Close the press. If you can pull the paper out easily, your pressure is uneven. You want enough resistance that the paper tears before it slides. Aim for 50-60 PSI on pneumatic presses. For manual presses, it should require significant effort to lock the handle, but not enough to strain your shoulder. Use heat press pillows only to clear seams or buttons; they can actually decrease pressure on the design area if used incorrectly. Calibration isn't a one-time event. Check your settings every 50-100 presses during long runs to maintain professional-grade durability.
TrueColor® vs. TrueColor® MAX: Heat Press Settings and Variables
Not all ink sets are created equal. While competitors offer generic settings, we know that ink density directly influences heat absorption and adhesive activation. The technical difference lies in the pigment load. Standard CMYK+W uses five channels, while our premium 9-color system adds orange, green, red, and blue to reach a wider gamut. This increased density requires more precise DTF transfer application instructions to ensure the adhesive melts fully without scorching the garment. High pigment loads act as an insulator. They require a specific thermal soak time to reach the bond line effectively.
Standard TrueColor® (5-Color) Parameters
The TrueColor® (5-Color) Standard DTF product is your high-speed workhorse. It's designed for efficiency on 100% cotton, a substrate with a long history of textile printing and excellent heat tolerance. For these transfers, set your press to 300°F to 310°F. Apply medium pressure for 10 to 12 seconds. This product is forgiving. It handles minor temperature fluctuations common in entry-level presses. If you're running high-volume basic tees, this is your go-to solution for reliable results. Most shops find that a warm peel at 5 to 10 seconds after pressing provides the cleanest release for these standard ink loads.
Premium TrueColor® MAX (9-Color) Optimization
When you upgrade to the TrueColor® MAX premium (9-Color) DTF product, you're dealing with a significantly thicker ink deposit. Bold, vivid graphics with deep reds or vibrant greens absorb heat differently than standard prints. You must adjust your dwell time to compensate. We recommend a consistent 320°F for 15 seconds with medium-heavy pressure. The extra 3 to 5 seconds ensures the heat penetrates the dense 9-color layers to reach the adhesive layer. This prevents the "cold peel" effect where the ink looks cured but the adhesive hasn't fully bitten into the fabric.
Ink density and adhesive melting points are inextricably linked. If you're pressing onto heat-sensitive synthetics like 100% polyester, drop your temperature to 275°F but increase your time to 20 seconds. This prevent dye migration while still securing the bond. Precision is the difference between a shirt that lasts 10 washes and one that lasts 50. Every second counts when you're managing a production floor with tight deadlines. If you want to see the vibrancy of 9-color printing for yourself, explore our premium transfer options today and experience the MoreTranz difference.
The MoreTranz Application Blueprint: A Step-by-Step Pressing Guide
Calibration is the foundation, but execution is the building. You've dialed in your settings; now you must follow a disciplined ritual. Mastering these DTF transfer application instructions ensures every garment leaves your shop with professional-grade quality. Consistency isn't an accident. It's the result of a repeatable process that eliminates variables from the pre-press to the final release. Ready to execute? Let's move.
Pre-Press: Moisture Removal and Surface Prep
If you skip the pre-press, you're inviting failure into your production line. Cotton is porous and naturally holds moisture. When you hit a damp garment with 300°F, that moisture flashes into steam. This steam creates a physical barrier between the fabric and the adhesive, leading to peeling or bubbling after the first wash. A mandatory 5 to 8-second pre-press is your insurance policy. Look for the faint mist rising from the platen; that's the moisture leaving the shirt. Don't forget the lint roller. A single stray hair or fiber trapped under the film will create a permanent void in your 9-color graphic.
The Primary Press and Cooling Phase
Position your gang sheet with confidence. Once aligned, execute the primary press using the industrial-strength pressure we calibrated earlier. For the TrueColor® MAX premium (9-Color) DTF product, the dwell time is critical for complete ink saturation and thermal soak. Once the timer hits zero, lift the platen quickly. MoreTranz transfers are specifically engineered for a cold peel process. Move the garment to a cooling station or wait 15 to 20 seconds until the film is cool to the touch. Use the "Snap" peel technique: grab one corner and pull in a swift, continuous motion. This ensures crisp edges and prevents the ink from stretching or lifting during the release.
The Second Press (Finishing Press) Essentials
This is the secret to the "soft hand-feel" that premium brands demand. Most shops stop after the peel, but the second press is what separates hobbyists from professionals. Place the garment back on the press and cover the design. This 5-second finishing press locks the ink deep into the fabric fibers, securing that 50+ wash durability. Your choice of cover material dictates the final look:
- Parchment Paper: Delivers a sophisticated matte finish and flattens the ink profile.
- Teflon Sheet: Produces a high-energy gloss finish that makes colors pop.
This final step eliminates the "plastic" feel of the transfer and ensures the design moves with the garment. It creates the comfort your customers expect from high-end apparel while providing the cold, reliable efficiency of industrial manufacturing. Don't cut corners on the finish; it's the signature of a professional-grade toolkit.
Fabric-Specific Instructions: Optimizing DTF for Every Substrate
Substrates aren't equal. Your DTF transfer application instructions must adapt to the specific chemical makeup of the garment. With 2026 EPA regulations shifting the landscape of textile dyes and adhesives, your application process needs to be cleaner and more precise than ever. Whether it's the natural absorbency of cotton or the heat-sensitive nature of polyester, precision is mandatory. A one-size-fits-all approach leads to ruined inventory and inconsistent durability. You must calibrate for the fabric, not just the film.
Pressing on 100% Cotton and High-Temp Blends
Cotton is the high-performance canvas for the TrueColor® MAX premium (9-Color) DTF product. Its natural fibers open up under heat, allowing the dense ink load to anchor deeply. For standard 4.5 oz tees, stick to a 310°F baseline. If you're pressing 12 oz heavy-weight hoodies, increase the dwell time by 3 to 4 seconds. The thicker fabric acts as a heat sink. You need that extra soak to ensure the adhesive reaches the core of the fibers. Blends like 50/50 or Tri-blends are more temperamental. Aim for 290°F to 300°F to balance adhesion with fiber protection, ensuring the vivid 9-color output remains bold without scorching the synthetic components.
Low-Temp Strategies for Polyester and Synthetics
Polyester is a different beast. High heat triggers dye migration, where the fabric's gaseous dye bleeds through the transfer and ruins your print. To prevent this, drop your temperature to 265°F or 275°F. Increase your time to 20 seconds. This "low and slow" approach secures the TrueColor® (5-Color) Standard DTF product without damaging the synthetic fibers. Look out for "box marks" or shiny outlines. These are signs of excessive heat or pressure on polyester. Use a protective cover and ensure your press is calibrated to the exact degree. Our transfers are engineered to bond at these lower thresholds, maintaining professional-grade durability even on performance wear.
Specialty substrates like denim and canvas require industrial-strength pressure. These fabrics have deep "valleys" in the weave. You must force the adhesive into these gaps. For heavy outerwear, increase pressure to 60 PSI or a "Heavy" manual setting. These rugged materials can handle 320°F easily. Don't let substrate variety slow your production speed. MoreTranz is a professional-grade toolkit designed for every challenge. If you're ready to scale your output across multiple fabric types, order your custom gang sheets and start pressing with total confidence.
Advanced Troubleshooting: Solving Common DTF Application Issues
Even with a professional-grade toolkit, production floors face friction. Ghosting occurs when the film shifts during the press cycle, creating a double image or a blurred shadow. This is a mechanical failure. Use heat-resistant tape to anchor your gang sheets. It's a simple, low-cost fix for a high-stakes problem. If you follow our DTF transfer application instructions and still see failures, the issue is often hidden in the artwork geometry or the substrate's physical barriers.
Preventing Adhesive Issues and Edge Lifting
Edge lifting isn't always a heat issue. It's often a geometry problem. Lines thinner than 0.018 inches (0.45mm) don't have enough surface area to hold the adhesive powder effectively. If your design has ultra-fine details, use the MoreTranz artwork upscaler to thicken these critical points before you submit your order. For garments with heavy seams, zippers, or pockets, use a pressing pillow to level the surface. This ensures the platen makes 100% contact with the TrueColor® (5-Color) Standard DTF product, preventing "dead zones" where the adhesive never activates. Without even pressure, the bond will fail within the first five washes.
Fixing Color Shifting and Scorching
The TrueColor® MAX premium (9-Color) DTF product is built for extreme vibrancy, but excessive heat is its enemy. If your deep reds turn brown or your whites look yellow, you've scorched the pigment. This happens when the press exceeds 330°F or the dwell time goes beyond 20 seconds. You're essentially "over-cooking" the ink. To recover a garment with minor heat marks, try a light mist of water or a professional garment steamer. It often lifts the scorched fibers and restores the fabric's appearance.
The 50+ wash durability we promise depends on a perfect chemical cure. If your prints crack after the first wash, you likely skipped the "Pre-Press" ritual or the "Second Press" finishing step we detailed in the blueprint section. MoreTranz is trusted by over 5,000 creators because we provide the tools to solve these bottlenecks. Don't let a minor calibration error ruin a premium 9-color print. Analyze your variables, adjust your pressure, and execute with the cold, reliable efficiency your brand demands.
Scale Your Production with Professional Precision
Success in the DTF industry isn't about luck; it's about the cold, reliable efficiency of your workflow. You've mastered the hardware calibration and learned how to adjust for the high ink density of our premium (9-Color) DTF product. By following these DTF transfer application instructions, you've eliminated the guesswork that leads to wasted inventory and failed wash tests. Whether you're pressing onto 100% cotton or heat-sensitive polyester, your prints will now deliver the vivid, bold impact your customers expect.
MoreTranz is trusted by over 5,000 creators because we provide the professional-grade toolkit needed for serious growth. With our industry-leading 9-color printing process and next-day turnaround on custom gang sheets, you can focus on scaling your brand while we handle the technical dominance. It's time to stop settling for standard results and start producing apparel that outlasts the competition. Order Your TrueColor® MAX Sample Pack and Test the 9-Color Difference today. Your journey to total production confidence starts here.
Frequently Asked Questions
What is the ideal temperature for TrueColor® MAX DTF transfers?
The ideal temperature for the TrueColor® MAX premium (9-Color) DTF product is 320°F. This specific setting ensures that the heat penetrates the dense 9-color ink layers to activate the adhesive fully. Use an IR thermometer to verify your platen's accuracy, as a 5-degree variance can compromise the bond. If your press runs hot, you risk scorching the vibrant pigments and losing the bold impact of the design.
Can I apply MoreTranz DTF transfers with a household iron?
You cannot apply MoreTranz transfers with a household iron. Professional DTF results require consistent, industrial-strength pressure that a manual iron cannot provide. Without the 50 to 60 PSI of a professional heat press, the TrueColor® (5-Color) Standard DTF product won't achieve the 50+ wash durability we promise. Investing in a reliable press is the only way to ensure commercial-grade results.
Do I need to peel the DTF film while it is hot or cold?
MoreTranz transfers are strictly cold peel. Wait 15 to 20 seconds until the film is completely cool to the touch before removing the carrier sheet. Peeling while hot will cause the ink to stretch or lift, ruining the crisp edges of your 9-color graphic. This cooling phase allows the adhesive to solidify and lock into the garment fibers for a permanent bond.
Why is my DTF transfer peeling off after the first wash?
Premature peeling is usually caused by trapped moisture or insufficient pressure during the initial application. If you skip the 5 to 8-second pre-press, steam creates a physical barrier that prevents the adhesive from biting into the fibers. Review your DTF transfer application instructions to ensure you're using medium-heavy pressure and a proper finishing press to lock the design in place.
How long should I press my DTF transfer for 100% polyester?
For 100% polyester, press for 20 seconds at 265°F to 275°F. This "low and slow" method prevents dye migration and scorching on sensitive synthetic fabrics. Maintaining this lower temperature threshold protects the garment's integrity while securing a permanent bond for your TrueColor® (5-Color) Standard DTF product. Always perform a test press on a scrap garment to verify the fabric's heat tolerance.
What is a "post-press" and is it really necessary for DTF?
A post-press, or finishing press, is a mandatory 5-second second press performed after the film is peeled. It locks the ink into the fabric and eliminates the plastic feel of the transfer. This step is the secret to achieving the soft hand-feel and industry-leading durability trusted by over 5,000 creators. It ensures your DTF transfer application instructions result in a retail-quality finish that lasts.
How do I prevent heat press marks on my shirts?
Prevent heat press marks by using a pressing pillow to lift the design area away from heavy seams and zippers. You can also reduce your temperature to the lowest recommended setting for the specific fabric type. Using parchment paper during the post-press helps distribute heat more evenly and prevents the "box mark" look on sensitive synthetics like polyester or tri-blends.
Can I use a Teflon sheet with MoreTranz transfers?
You can use a Teflon sheet, but it will result in a high-energy gloss finish on the final print. If your brand demands a sophisticated matte look, use parchment paper during the finishing press instead. Both materials protect the TrueColor® MAX ink during the application while ensuring the adhesive sets perfectly into the garment without sticking to the platen.