
How to Prepare Artwork for DTF Printing: The Professional 2026 Guide
Your high-resolution monitor is lying to you. Even the most vibrant digital masterpiece can transform into a muddy, peeling disaster the moment it hits the heat press if your file setup ignores industrial realities. You've likely felt the frustration of seeing a "perfect" design arrive with dull colors or a thick white box around the edges. It's a waste of time and a drain on your profit margins.
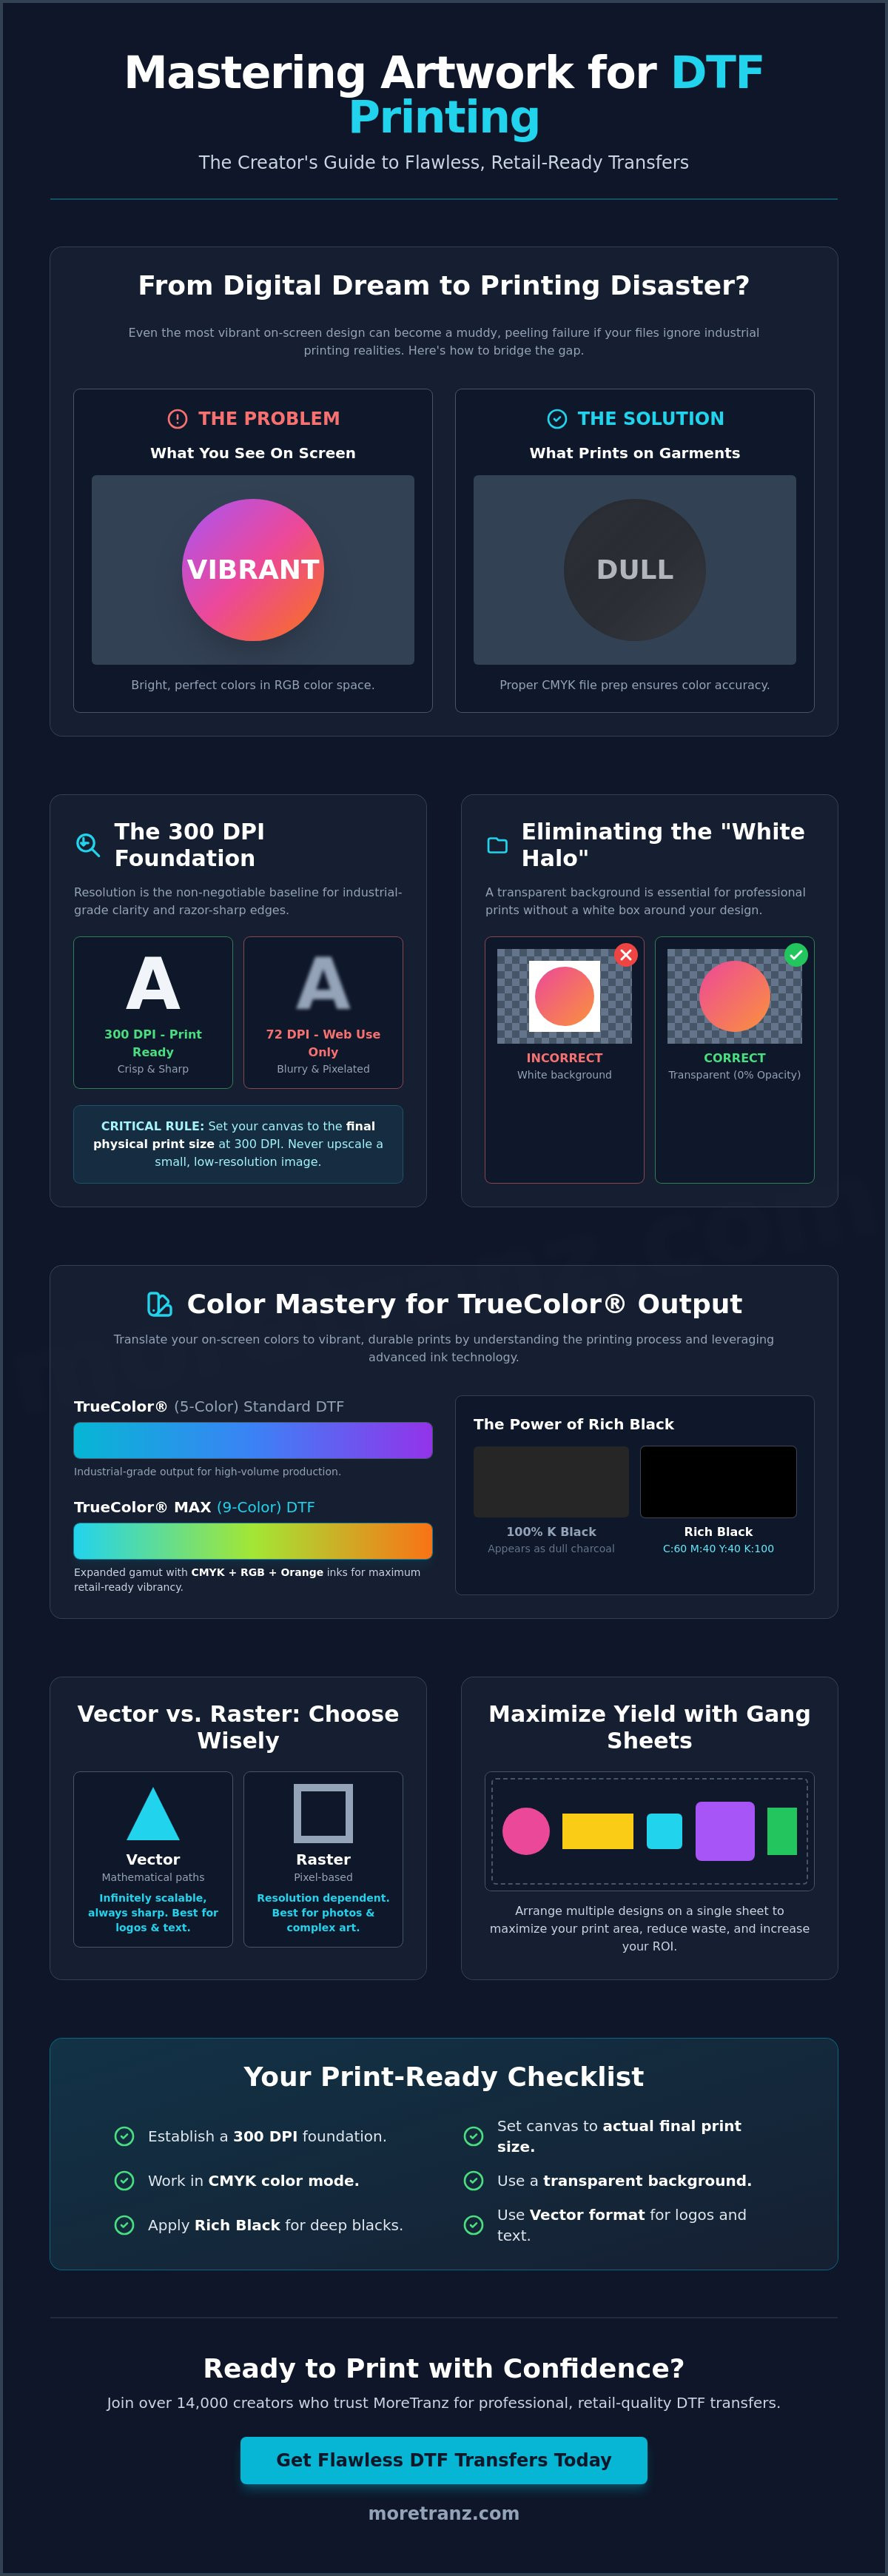
Mastering how to prepare artwork for DTF printing is the only way to bridge the gap between a screen and a retail-ready garment. We've helped over 14,000 creators at MoreTranz optimize their workflows for maximum impact. This guide will teach you the technical art of file preparation to ensure your transfers arrive with the vivid colors of our TrueColor® MAX (9-Color) DTF system and the industrial-grade durability your brand demands. We'll cover the exact settings for 300 DPI resolution, CMYK color profiles, and the transparent background secrets required for crisp edges without the dreaded white halo.
Key Takeaways
- Establish a 300 DPI foundation at actual print size to guarantee your transfers maintain industrial-grade clarity and razor-sharp edges.
- Transition your workflow from RGB to CMYK to harness the expanded color gamut of TrueColor® MAX (9-Color) DTF output.
- Learn exactly how to prepare artwork for DTF printing by utilizing 0% opacity backgrounds to eliminate the white halos that ruin professional designs.
- Scale your production efficiency like 14,000 creators by optimizing your DTF Gang Sheets for maximum print yield and ROI.
- Identify when to leverage professional Vector Conversion Services to transform low-quality art into high-performance, print-ready assets.
The 300 DPI Foundation: Resolution and Scaling for DTF
Resolution is the pulse of your production cycle. In industrial-grade output, 300 DPI (dots per inch) is the non-negotiable baseline. Lower resolutions result in pixelated edges and muddy details that no amount of ink can fix. When you understand how to prepare artwork for DTF printing, you realize the digital file is the blueprint for the final garment. If the blueprint is blurry, the final product will be unprofessional. Direct-to-film (DTF) printing technology relies on precision droplet placement. Every missing pixel in your file becomes a visible gap or a jagged edge on the film.
The most common failure is the "Physical Size" trap. A 300 DPI file at postage stamp size is useless for a full-back print. You must set your canvas to the exact dimensions of the final output. If you need a 10-inch wide logo, your workspace must be 10 inches wide at 300 DPI from the start. Never rely on software upscaling. Stretching a low-res image just creates artifacts like "ghosting" and noise. These imperfections become glaringly obvious when printed using our high-intensity TrueColor® MAX (9-Color) DTF process.
To better understand these resolution principles and avoid costly mistakes, watch this technical breakdown:
Identifying low-resolution artifacts before they hit the film is a vital skill. Zoom in to 300% on your design. If you see "stairs" on the curves or fuzzy clouds around the edges, those will appear in the print. We've seen thousands of designs at MoreTranz; the ones that pop are always the ones that started with a clean, high-resolution foundation. Don't let a 72 DPI web image sabotage your brand's reputation.
Setting Up Your Workspace
Efficiency starts with the right environment. In Photoshop, always create a new document with the resolution field set to 300 Pixels/Inch. In Adobe Illustrator, ensure your Document Raster Effects are set to High (300 ppi) to keep effects like shadows crisp. Avoid web assets; they're built for fast loading on screens, not for the high-pressure heat application of professional apparel. Check your "Effective DPI" in your layout software. If you scale an image up, that number drops, and your quality vanishes instantly.
Vector vs. Raster: Which Wins for DTF?
Vectors are the champions of high-impact branding. Because they use mathematical paths instead of pixels, you can scale a pocket logo to a billboard size without losing a single sharp edge. Learning how to prepare artwork for DTF printing often means choosing the right file format for the job. MoreTranz recommends vector files for logos and typography to ensure maximum precision. Raster files are necessary for photographs or complex gradients, but they must be high-resolution. If you're stuck with a blurry logo, our Vector Conversion Service can turn that low-res asset into print-ready gold, ensuring your brand stands out among the 14,000 creators we serve.
Color Mastery: Preparing Files for TrueColor® MAX Output
Your high-end monitor uses light to create color, but your heat press relies on ink. This fundamental difference is where most creators fail. To master how to prepare artwork for DTF printing, you must understand that the RGB spectrum on your screen is wider than standard CMYK printing. While many shops struggle to replicate vibrant oranges or deep magentas, we've engineered a solution that closes the gap. Our TrueColor® (5-Color) Standard DTF product provides the reliable, industrial-grade output required for high-volume production. However, for brands that demand retail-ready intensity, TrueColor® MAX (9-Color) DTF utilizes a specialized ink system including CMYK, RGB, and Orange to hit the colors standard printers simply cannot reach.
Following artwork preparation best practices ensures your colors translate accurately from the monitor to the fabric. One critical rule for professional results is the use of Rich Black. Never settle for 100% K (Black) in your design software. On a garment, 100% K often appears as a dull charcoal. Instead, use a Rich Black formula like C:60, M:40, Y:40, K:100. This creates a deep, opaque finish that looks premium and resists the "washed out" look after multiple cycles in the wash. We've seen 14,000 creators transform their brands by making this one simple technical adjustment.
TrueColor® MAX Technical Specs
Unlocking the 9-color gamut requires precision. When you're building a custom gang sheet, embed the Coated FOGRA39 color profile to maintain consistency across every design on the roll. This ensures that your brand's signature colors remain identical from the first print to the last. If you're unsure if your colors are within the printable range, you can always test your designs with a MoreTranz Sample Pack to see the visual intensity in person.
Managing Gradients and Fades
The "Transparency Trap" is the most common cause of failed prints on dark garments. DTF printing requires a solid white underbase to make the top colors visible. If your design features soft glows or fades that drop below 10% opacity, the printer may not trigger the white ink layer. This results in "halos" or "missing" sections in your print. To solve this, use dithering in Photoshop. Dithering converts smooth fades into a pattern of solid pixels, allowing the white ink to adhere properly while maintaining the visual illusion of a soft gradient. This technique is essential for how to prepare artwork for DTF printing when working with complex, photographic elements.
Eliminating the Halo: Background Removal and Edges
A transparent background is the most misunderstood requirement in digital production. To the untrained eye, a white box looks like "nothing." To a high-performance DTF printer, that white box is a command to deposit a solid slab of ink. When learning how to prepare artwork for DTF printing, you must ensure your background is truly 0% opacity. If you simply hide a layer or leave a white fill, your design will arrive as a rigid, unwearable block. MoreTranz utilizes advanced RIP software that reads transparency data with surgical precision; if your file contains a single pixel of 1% opacity, we're going to print it.
The "halo effect" is the ultimate enemy of professional apparel. This occurs because of anti-aliasing, a software feature that smooths edges by adding semi-transparent pixels. While this looks great on a website, it's a disaster for transfers. The printer places a white underbase behind every pixel it sees. Those semi-transparent edge pixels result in a thin white line peeking out from under your design. For industrial-grade results, you need hard, crisp edges. This ensures the adhesive and the white ink layer align perfectly, creating a seamless bond with the fabric that stands up to the rigorous standards of the 14,000 creators who trust our process.
Pro-Grade Background Removal
Precision requires the right tools. Stop using the Magic Wand for complex designs; it leaves jagged edges and stray pixels that ruin your print quality. The Pen Tool is the industry standard for creating clean, professional paths. Once you've removed the background, create a "Check Layer" by placing a solid, high-contrast color like neon green behind your artwork. This reveals the "hidden" artifacts and stray pixels that often escape the naked eye. Delete these immediately to prevent white ink leakage. Mastering these small details is a core part of how to prepare artwork for DTF printing for retail-ready brands.
Preparing Art for UV DTF Decals
Hard-surface applications require a different level of technical discipline. Our UV DTF Decals utilize a specialized varnish layer that adds both protection and a premium tactile finish. Unlike fabric transfers, these decals are applied to glass, metal, and tumblers where every imperfection is magnified. You must ensure your edges are razor-sharp to allow the varnish to seal the design correctly. Small text must maintain a minimum stroke weight of 1pt to ensure it remains legible and adheres securely to curved surfaces. If your art is too delicate, the adhesive won't have enough surface area to grip, leading to premature peeling on high-use items.
Maximize Your Yield: Building Custom DTF Gang Sheets
Efficiency is the difference between a side hustle and a scalable brand. A DTF Gang Sheet is a single continuous roll of film containing multiple designs, allowing you to pay for the space rather than the individual print. This is why 14,000 creators utilize this production-first strategy to slash their costs and maximize ROI. When you master how to prepare artwork for DTF printing at scale, you stop thinking about single logos and start thinking about square footage. Every empty inch on your digital canvas is a lost opportunity for profit.
The "Safety Margin" rule is your insurance policy against production waste. Always leave at least 0.25 inches of space between your designs. This gap prevents accidental damage during the cutting process and ensures the heat press has a clean, unobstructed surface to grip. You can even mix different aesthetics on a single sheet to diversify your inventory. Combine your high-intensity TrueColor® MAX (9-Color) DTF logos with specialized Glitter DTF transfers on the same roll to offer a premium product line without paying for multiple shipping cycles. This flexibility is what separates professional practitioners from amateurs.
The Perfect Gang Sheet Layout
Precision layout starts with selecting your total sheet size. MoreTranz provides standard 22-inch wide rolls in lengths ranging from 24 inches to 60 inches. Nesting is the art of fitting smaller designs into the negative space created by larger ones. Rotate your artwork 90 degrees to fill every available gap on the film. If you're also producing hard-surface branding, remember that the same layout logic applies to your UV DTF Decals. Maximize your yield by packing the sheet tight while respecting the safety margins.
Exporting for Success
PNG and PDF remain the undisputed kings of DTF file formats. PNGs preserve the vital transparency data required to avoid the white halos discussed in previous sections. PDFs maintain the crisp vector paths necessary for industrial-grade typography. Use clear naming conventions for rapid production fulfillment, such as "OrderNumber_ProjectName_22x60." Before you upload to MoreTranz, run through this final checklist:
- Are all embedded images 300 DPI at their final physical size?
- Is the background truly 0% opacity with no stray pixels?
- Is your color profile set to Coated FOGRA39 for maximum accuracy?
- Have you maintained the 0.25-inch safety margin between every design?
Ready to scale your production? Build your high-yield layout with our professional-grade DTF Gang Sheets today to get the most out of every linear foot.
Professional Precision: MoreTranz Artwork Services
Execution beats theory. While you now possess the technical blueprint for how to prepare artwork for DTF printing, the reality of high-volume production often demands a higher level of intervention. Sometimes a client provides a pixelated screenshot; other times, a complex logo has been lost to years of low-res saves. In these moments, the decision to DIY or call in the professionals determines whether your brand projects industrial-grade quality or amateur effort. We've built our reputation as a tech-forward facilitator by offering specialized utilities that remove the friction from your pre-production workflow.
Our Background Removal Service is engineered to deliver the guaranteed "Halo-Free" results we discussed in previous sections. Instead of wrestling with semi-transparent pixels that leak white ink, you can delegate the technical heavy lifting to our expert team. This isn't just about saving time. It's about the cold, reliable efficiency of knowing your file is 100% compliant with our TrueColor® MAX (9-Color) DTF system. Professional art preparation is a direct investment in your brand's reputation. A single failed batch of garments costs far more than a one-time correction service.
Leveraging Expert Vector Conversion
Our Vector Conversion Service is the ultimate toolkit for the modern entrepreneur. We don't just "auto-trace" your designs. Our technicians perform manual recreations to ensure every path is mathematically perfect for high-definition output. This precision ensures your branding remains consistent whether you're ordering TrueColor® (5-Color) Standard DTF transfers or our specialized Spangle Transfers. For complex, multi-color logos that require exact color matching, a professional vector file is the only way to guarantee that the visual intensity of your digital art matches the physical resilience of the final print.
Ready to Press: The Final Stage
Confidence in your output comes from physical testing. We invite you to order a Free Sample Pack to see the difference that professional art prep makes on various fabric types. This allows you to transition from the design phase to the application stage with total certainty. Join the 14,000 creators who have stopped guessing and started scaling. By mastering how to prepare artwork for DTF printing and knowing when to leverage our professional-grade services, you position your business as a high-performance partner in the creative industry. Your designs deserve the technological dominance of MoreTranz.
Dominate Your Market with Production-Ready Art
Precision is the ultimate competitive advantage in the high-stakes world of custom apparel. You now possess the technical roadmap for how to prepare artwork for DTF printing to ensure every garment you produce looks retail-ready and professional. By anchoring your designs in a 300 DPI foundation and mastering the transition from RGB to CMYK color spaces, you've eliminated the most common causes of production failure. You've learned how to strip away stray pixels to prevent white halos and how to maximize your ROI with high-yield gang sheets.
Now it's time to put that knowledge into production. Join the 14,000 creators who trust MoreTranz to bring their vision to life with our proprietary TrueColor® MAX (9-Color) DTF technology. Whether you're testing a single design or scaling a massive inventory, we offer no minimum order requirements to keep your business agile and responsive. Don't let technical errors slow your momentum or drain your profits.
Build Your Custom TrueColor® MAX Gang Sheet Now
Your brand's growth depends on the quality and durability of your output. Stop settling for standard market alternatives and start delivering the visual intensity your customers demand. We're ready to print when you are.
Frequently Asked Questions
What file format is best for DTF printing?
High-resolution PNG and PDF files are the industry-standard formats for professional transfers. PNG files are essential for raster images because they preserve the 0% opacity backgrounds required for clean edges. PDFs are superior for typography and logos as they maintain vector paths, ensuring your branding stays razor-sharp at any scale. Always ensure your files are exported at 300 DPI to maintain industrial-grade clarity.
Can I use a JPEG for my DTF transfer?
Don't use JPEG files for your DTF production. JPEGs do not support transparency and will always include a solid background, usually white, which our printers will interpret as a design element. This results in an unwearable block of ink on your garment. Always export your raster designs as high-resolution PNGs to maintain the technical integrity of your artwork and avoid wasting film space.
Why did my DTF print come out with a white outline?
A white outline, or "halo," typically occurs due to anti-aliasing or stray pixels along the edges of your design. When you learn how to prepare artwork for DTF printing, you must ensure edges are hard and crisp. Semi-transparent pixels at the boundary trigger the white ink underbase, causing that unwanted border. Use the Pen Tool for clean paths and a high-contrast check layer to identify artifacts before uploading.
How do I make sure my colors are accurate in DTF?
Setting your workspace to the CMYK color space is the first step toward professional color accuracy. Specifically, embed the Coated FOGRA39 color profile in your final export to ensure our industrial printers interpret your data correctly. For the most demanding projects, using our TrueColor® MAX (9-Color) DTF system allows you to reach vibrant oranges and magentas that standard 5-color setups simply cannot replicate.
What is the difference between TrueColor® and TrueColor® MAX prep?
The technical preparation for TrueColor® (5-Color) Standard DTF and TrueColor® MAX (9-Color) DTF is largely identical regarding resolution and transparency. The primary difference lies in the color gamut. When you're learning how to prepare artwork for DTF printing for the MAX system, you can utilize much more vibrant, saturated colors in your design that would normally appear dull on a standard transfer. Both require 300 DPI for precision results.
Do I need to mirror my artwork before uploading for DTF?
Do not mirror your artwork before uploading it to MoreTranz. Our specialized RIP software automatically handles the mirroring process during the production cycle. If you mirror the file yourself, your final print will arrive backward. Upload your designs exactly as you want them to appear on the finished garment for a frictionless fulfillment experience. This allows you to focus on design while we handle the technical execution.
How much space should I leave between designs on a gang sheet?
Maintain a minimum safety margin of 0.25 inches between every design on your gang sheet. This space is critical for the cutting process and ensures the heat press has enough clear surface area to apply pressure evenly. Packing designs too tightly risks damaging the edges of your transfers during post-production. This is a standard practice shared by the 14,000 creators who scale their brands with our high-yield rolls.
Can I prepare artwork for Spangle transfers the same way as DTF?
Spangle Transfers require a different preparation method compared to standard DTF. While DTF can handle complex raster gradients, Spangle designs must be entirely vector-based. Each "dot" in a Spangle design represents a physical sequin-like element, so your file must be structured with specific paths that our machines can translate into physical placement. Use our Vector Conversion Service if you need help transitioning a standard logo into a Spangle-ready format.