


Creating a Sequin Effect Without Sewing: A Practical Guide
Hand-sewing sequins one at a time isn’t the only way to get a bright, dimensional finish. Creating a sequin effect without sewing can be a practical choice for a small project or a repeated design, but the right method depends on the shine, texture, and workflow you want.
If you’re concerned a no-sew option might look too flat, feel too stiff, or be difficult to apply, compare the methods before choosing. Fabric glue, glitter heat-transfer vinyl, and heat-applied spangle transfers produce different results. Matching the method to your design helps the finish look intentional rather than improvised.
This guide compares those options, explains what to prepare, and helps you test a design before decorating multiple garments. You’ll see where individual sequins or sequin fabric may fit, and how a transfer-based approach can create sparkle without stitching each piece in place. Start with the effect you want, then test your chosen method on a sample.
Key Takeaways
- Creating a sequin effect without sewing can mean anything from glued embellishments to a heat-applied transfer, with each option producing a different look and feel.
- Compare shine, texture, application steps, and project scale to narrow down the method that fits your design.
- Test your chosen finish on a sample garment or fabric before decorating a larger run.
- Transfers by MoreTranz Spangle Transfers offer a transfer-based way to create a sequin-inspired design without stitching individual sequins.
- Follow the product’s application and care instructions, then inspect the finished decoration before repeating the process.
Creating a Sequin Effect Without Sewing: What Creates the Look?
A sequin effect is a decorative finish that suggests sequins through reflective shine, repeated shapes, or dimensional detail, without necessarily using individual sequins stitched onto fabric. The effect can come from attached embellishments, patterned material, or a printed or heat-applied design. Each approach creates a different balance of sparkle, texture, and detail.
That distinction matters: visual sparkle and physical texture aren’t the same. A flat graphic can use bright highlights and dark contrast to suggest reflective pieces, but it won’t feel like raised embellishments. Applied sequins or other dimensional details add texture, though their appearance depends on the materials and how they’re placed. Decide which quality matters most before choosing a technique.
The main no-sew options are attaching embellishments or sequin fabric with fabric adhesive, using decorative surface materials, and applying a heat-transfer design. MoreTranz Spangle Transfers provide a transfer-based option for suitable designs, replacing the task of stitching individual pieces with a heat-applied decoration. No single method suits every garment or artwork. Start with the look you want, then consider the fabric and application process.
What makes a design look like sequins?
Three visual cues do much of the work: reflective highlights, repeated shapes, and contrast. Small, closely spaced circles can suggest a dense sequin surface. Larger shapes with more space between them create a bolder, more graphic impression. Placing bright areas beside darker tones can mimic the way light catches individual pieces, even in a flat design.
Color also changes the result. A tight palette can make a pattern feel uniform, while contrasting hues create a more varied surface. View the artwork from the distance at which it will usually be seen. Details that read clearly up close may blend together across a room. This helps you judge whether the design will look like scattered sparkle, a repeated sequin pattern, or raised decoration.
Which projects benefit from a no-sew finish?
A no-sew approach can suit custom shirts, team apparel, event garments, and small creative projects where you want to add sparkle without attaching each piece by hand. Repeating one design across several garments may be more straightforward with a transfer or adhesive-applied surface than with individual stitches, particularly when the artwork has a defined layout.
Match the process to the garment. Stretchy, textured, or delicate fabric may behave differently during adhesive or heat application, so don’t assume a technique will suit every material. For designers working with delicate weaves from wholesale silk fabric london suppliers, testing lower heat settings is vital to protect the fibers. The intended use matters, too: a small decorative accent calls for different design choices than a large, densely patterned area. Test the finish on comparable fabric first to assess scale, shine, and texture before committing to the full design.
No-Sew Sequin Effect Methods: From Fabric Glue to Heat Transfers
Choose the application method based on the finish you want and how much hands-on work the design involves. Glued embellishments give you direct control over placement. Decorative fabric or a surface treatment can cover an area with a chosen pattern. Heat-applied transfers let you apply a prepared design as a coordinated unit, rather than attaching or stitching each detail separately.
These methods aren’t interchangeable. A glued design may show distinct raised pieces, while a transfer applies a set artwork layout. Glitter-focused options emphasize sparkle, but the exact appearance and feel depend on the material and design. When creating a sequin effect without sewing, compare the visual result you want with the steps and tools you can use.
When do glued or surface-applied embellishments make sense?
For a one-off project or a small motif, fabric adhesive and individual sequins let you place each piece by hand. Apply adhesive in a controlled area, position the embellishments according to your pattern, and follow the adhesive’s directions. For broader coverage, a piece of sequin fabric can create a consistent decorative area. In either case, the design and materials determine the pattern, spacing, and coverage.
Surface work takes hands-on effort. You can adjust placement as you build the design, which is useful for a custom accent or irregular motif. The tradeoff is that reproducing the same layout across several garments means carefully repeating those placements. Before decorating a finished garment, test the adhesive, embellishment, or fabric on a spare piece of similar material. Check how the surface looks and feels, and let the test piece dry or settle as the product instructions direct.
How can a heat-applied transfer create a sequin-inspired finish?
A heat-applied transfer starts with prepared artwork. Position it on the garment, then use a heat press according to the transfer’s current application instructions. Because the design arrives as a coordinated layout, you don’t need to position and attach each decorative element yourself. This can make the workflow more consistent when repeating a suitable design.
MoreTranz Spangle Transfers are one option for a sequin-inspired design without stitching individual sequins. Glitter DTF transfers are another transfer-based option for sparkle, with a different design format and finish. Compare the artwork and the effect you want before choosing. Don’t assume every glitter treatment will look or feel like individual raised pieces.
Keep application settings specific to the product and garment. Use the transfer’s instructions for temperature, pressure, timing, and any post-press steps rather than relying on settings from another material. If you’re deciding how a finish will look on fabric, the MoreTranz Sample Pack can help you evaluate transfer options before planning a larger decoration project.
Which No-Sew Sequin Effect Is Right for Your Design?
The right choice depends on the result you want to see and feel, and on how you’ll repeat the design. A sequin-inspired transfer can suggest the shine and pattern of sequins, but it may not feel identical to individually sewn pieces. Consider appearance, texture, and workflow separately before deciding.
How do appearance, texture, and workflow differ?
Compare the shine, motif definition, and coverage on the actual garment color. Then consider surface feel: adhesive-applied pieces, decorative fabric, and transfers can each create a different tactile result. Separate design time from application time, too. A hands-on method gives you control over individual placement; a prepared transfer applies a coordinated layout, though its artwork still needs to be chosen or prepared.
| Method | Visual effect | Surface feel | Workflow and suitable scale |
|---|---|---|---|
| Glued embellishments | Distinct pieces with individually arranged shine | Depends on the embellishments and adhesive | Hands-on placement; suits a small motif or one-off project |
| Decorative sequin fabric | Patterned coverage across a chosen area | Comes from the fabric’s surface and construction | Position and attach a fabric piece; useful for a defined panel or accent |
| Spangle transfer | Coordinated, sequin-inspired artwork | Depends on the transfer and garment | Apply a prepared design; practical for repeat placement across garments |
| Glitter DTF transfer | Glitter-focused sparkle rather than a sequin-pattern effect | Depends on the transfer and garment | Apply prepared artwork; suits designs where glitter is the main visual cue |
Spangle-style sparkle and glitter effects aren’t interchangeable. One can evoke a repeated sequin-like motif, while a glitter transfer emphasizes a glitter appearance. Compare the artwork at its intended size and against the garment color. For a closer look at this alternative finish, explore MoreTranz Glitter DTF Transfers.
When is a transfer-based finish the practical choice?
For a logo or graphic that needs consistent placement on several shirts, a transfer can simplify repeating the same prepared design. You still need to create or select artwork and follow the transfer’s application instructions, but you avoid arranging each embellishment separately. This can suit a maker testing a small apparel run as well as a larger project.
A hands-on method may be a better fit for a unique, small-scale motif where you want to place each piece individually. If surface texture is central to your idea, judge a physical sample rather than relying on the artwork alone. If visual consistency and repeat placement matter more, compare transfer options on a test garment first. The MoreTranz Sample Pack can help you evaluate transfer finishes before choosing one for your project.
When creating a sequin effect without sewing, make your final choice against three practical criteria: how the design looks at its intended size, how you want it to feel on the garment, and whether you can repeat the steps reliably. A small test can reveal mismatches before you decorate multiple pieces.
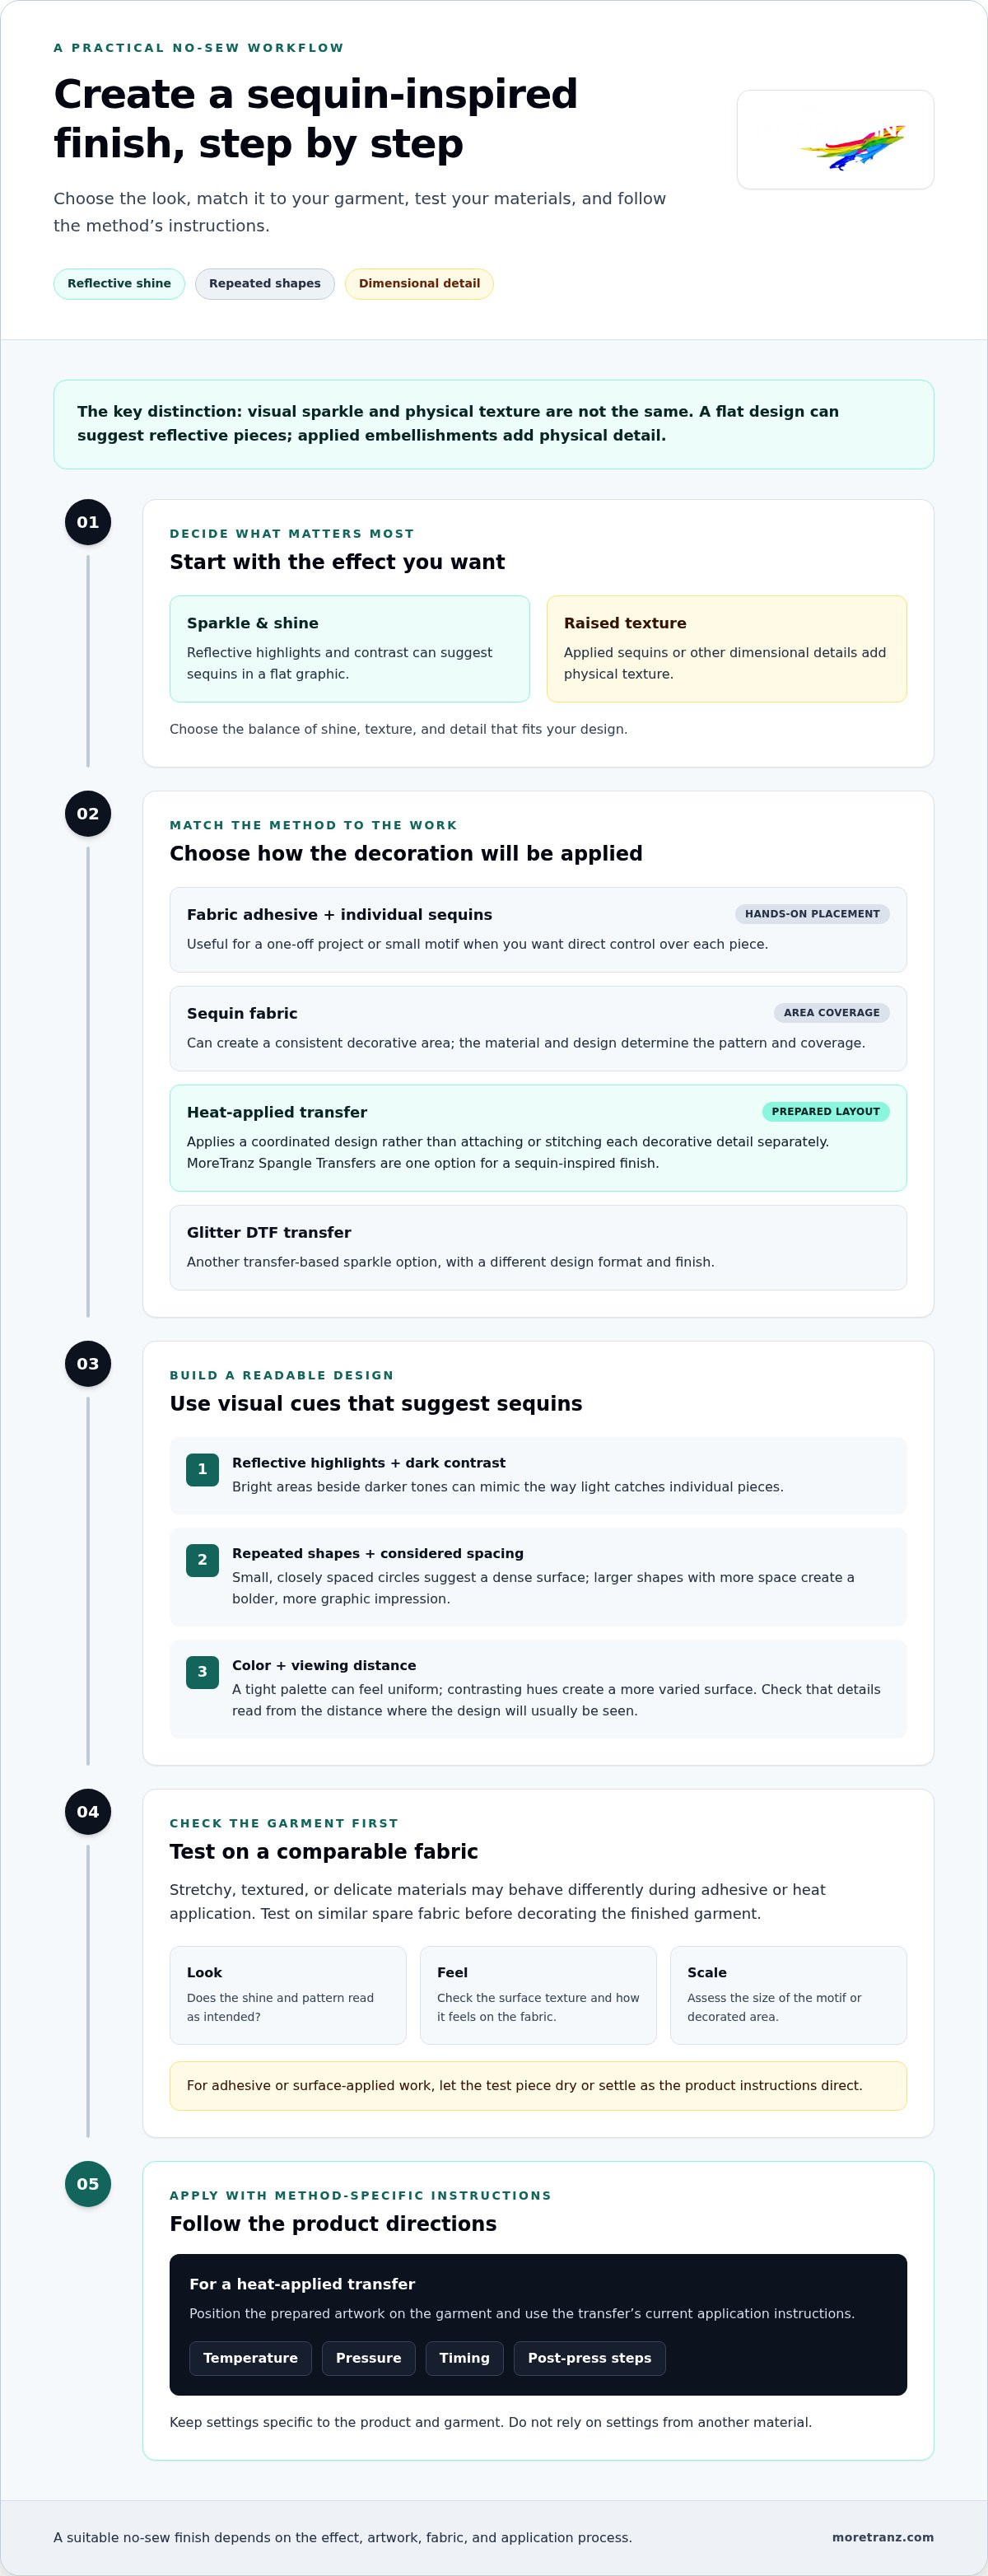
How to Create a No-Sew Sequin Effect Step by Step
A clean result starts before the press or adhesive comes out. Use this sequence to check the look on fabric and avoid repeating a setup that hasn’t been tested.
- Choose the garment. Select fabric that suits the decoration method, then check the garment’s care label and the product instructions. Pick a flat, accessible area so seams, folds, or bulky details don’t interfere with positioning.
- Prepare the artwork. View the design at its intended finished size. Check that small shapes, gaps, and outlines remain clear and that the pattern has the coverage you want. Artwork that looks crisp on a screen may lose detail when scaled down. MoreTranz offers vector conversion and background removal for artwork preparation when needed.
- Confirm the application process. Identify the specific transfer and equipment you’ll use. Review the current MoreTranz transfer instructions for the applicable settings and sequence. Don’t substitute settings from another transfer or rely on a remembered temperature, pressure, or press time.
- Position before applying. Lay the garment flat and align the design where you want it. Check its placement against the garment’s center, seams, and intended viewing angle. Rushing this step can leave a crooked design or inconsistent placement across a set.
- Test on comparable fabric. Apply the design to a spare piece or sample garment made from similar material. Follow the transfer’s instructions, including any directions about cooling or finishing. A test helps you assess scale, contrast, and surface effect before decorating more items.
- Inspect the result. After completing the instructed finishing steps, check the edges, alignment, and visible details. Look for areas that appear lifted, unclear, or uneven. Follow the product’s care guidance rather than assuming all transfer types need the same treatment.
- Repeat only after review. If the test meets your design goal, use the same artwork, placement reference, equipment, and product-specific process for the next garment. If it doesn’t, adjust the artwork or placement and test again instead of proceeding with a full run.
Skipping a test, using artwork with details too small to read, or placing a transfer before checking its alignment can waste time and materials. Treat the sample as a production check, not just a preview. It lets you assess how the design reads on the actual fabric and confirm the workflow before decorating multiple garments.
Try MoreTranz Spangle Transfers for a Sewing-Free Sequin Look
For suitable artwork, MoreTranz Spangle Transfers offer a transfer-based way to create a sequin-inspired design without stitching individual sequins. Apply the design as a transfer instead of placing embellishments one by one. The finished look depends on the artwork, garment, and application, so evaluate it before planning a larger run. Testing is a practical final step in creating a sequin effect without sewing.
What should you evaluate in a sample?
Assess the design on fabric similar to the garment you plan to decorate. Follow the current instructions for the selected transfer, then review the sample under lighting and viewing conditions similar to where the garment will be seen.
- Visual effect: Does the shine and pattern read clearly at the intended viewing distance?
- Color and contrast: Do the design colors stand out against the fabric, or do details blend in?
- Scale and placement: Does the motif feel balanced in the planned decoration area?
- Overall fit: Does the effect support the garment’s design rather than compete with it?
Record the artwork dimensions, garment type, placement, and application choices used for the test. Those notes make it easier to reproduce the version you prefer and identify what to adjust if the sample doesn’t meet your goal.
How can you move from test to finished apparel?
Once the sample meets your visual target, finalize the design dimensions and placement. Keep the artwork file and positioning reference consistent across garments, and use the instructions for the selected transfer and application setup. Follow its directions for settings, pressing sequence, and any finishing or care steps. Don’t carry over settings from a different product.
MoreTranz serves 14,000 creators, including makers and decorators developing designs at different scales. A sample-first approach lets you judge the transfer finish on fabric before committing to a larger decoration project. If you’re adjusting the artwork or trying another garment color, make those changes on the test before settling on the production version.
Ready to compare transfer finishes for your design? Get the MoreTranz Free Sample Pack.
Make Your Next Design a Standout
Give your next garment a clear visual point of view. A sequin-inspired finish can become part of the design, not just an extra flash of shine. Consider how scale, placement, and color work with the garment’s silhouette, then choose a direction that feels deliberate. Creating a sequin effect without sewing gives you room to explore the look without building the decoration from individual stitches.
Start with one design and make intentional choices. A focused motif can create impact without covering the entire garment, while a more expansive layout can make sparkle the centerpiece. Use your sample to decide which direction works for the finished project. Refining the design before production can help turn a promising idea into one you’re ready to make.
Choose your direction, test the look, and bring your next bright idea to life with a MoreTranz sample.
Frequently Asked Questions
Can you make a sequin effect without sewing?
Yes. Fabric adhesive, decorative sequin fabric, and heat-applied transfers can all create a sequin-inspired finish without stitching each embellishment onto a garment. The best route depends on whether your priority is individually placed details, a defined area of surface decoration, or a coordinated design. Adhesive may suit a small handmade accent; a transfer may be more practical for repeating artwork.
What is the easiest way to create a sequin look on a shirt?
A prepared transfer can be a straightforward choice if you have a heat press and artwork that fits the shirt. Plan the placement first, then apply the transfer using its product-specific instructions. A MoreTranz Spangle Transfer is one option for a sequin-inspired design. If the shirt fabric isn’t suited to the transfer, choose another method and test it on similar material.
Do no-sew sequin effects look like real sewn sequins?
They can suggest the sparkle or repeated pattern of sequins, but they won’t necessarily look or feel identical to sewn-on pieces. Individual sequins create a distinct, tactile surface, while a printed or transferred design may emphasize the visual pattern more than raised texture. Decide what matters most for your project: a clear motif from a distance, a reflective surface up close, or the feel of separate embellishments.
Can you use fabric glue to attach sequins without sewing?
Yes. Choose an adhesive intended for fabric and follow its directions for application and curing. Work on a protected surface, arrange a few sequins first, and apply adhesive in a controlled amount so it doesn’t spread beyond the design. Test the glue and embellishments on a spare piece of similar fabric before decorating the shirt. The trial lets you check appearance and placement before committing to the full design.
How do you apply a heat transfer for a sequin-inspired design?
Position the prepared transfer on a flat garment, check alignment, and apply it with the recommended heat-press setup. Use the current instructions for that specific transfer to determine settings, pressing sequence, and any cooling or finishing steps. Don’t guess or borrow settings from another product. After application, inspect the design and follow the transfer’s care directions.
Can a no-sew sequin effect be used on any fabric?
No. Fabric construction, texture, stretch, and heat sensitivity can affect whether a particular adhesive or transfer is suitable. Read the garment care label alongside the application directions for the decoration product. If the material is unfamiliar, test the method on comparable fabric first. A technique that works on a smooth shirt may behave differently on textured or delicate material.
How can I test a sequin-effect transfer before decorating several garments?
Apply the transfer to a sample garment or a piece of similar fabric, following its current instructions. Check that the design is aligned, the details are visible at the intended size, and the colors work with the fabric. Record the garment type, artwork dimensions, placement, and application choices. This creates a repeatable reference and gives you a chance to adjust the design before preparing multiple pieces.