

How to Create a Gang Sheet in Canva: Step-by-Step Print Setup Guide
Canva is built for digital screens, not commercial textile printing, and ignoring that reality ruins production runs fast. If you want to master how to create a gang sheet in Canva, you have to know how to bypass its built-in software limits. You already know the frustration: custom canvas dimensions capped at 83.328 inches, default 96 DPI exports that print blurry, and stray background fills that press disastrous white halos onto dark garments. Wasting expensive roll space simply isn't an option when tight margins are on the line.
You don't need complicated graphic suites to produce clean, professional transfers. In this guide, you'll discover how to configure proportional dimensions, nest artwork tightly to drive down unit costs, and export pristine 300 DPI files with true transparency. Here is your step-by-step blueprint to building industrial-grade DTF gang sheets directly inside Canva.
Key Takeaways
- Master how to create a gang sheet in Canva by setting custom dimensions and bypassing maximum canvas constraints with proportional scaling.
- Pack designs tightly using visual nesting strategies to slash wasted roll film and drive down your per-transfer production costs.
- Eliminate blurred prints and unwanted white halos by auditing transparency and isolating semi-transparent drop shadows before export.
- Lock in razor-sharp 300 DPI resolution using Canva's PDF Print engine configured for commercial production workflows.
- Bridge your layout directly to industrial hardware with MoreTranz TrueColor® or TrueColor® MAX print technologies built for high-volume durability.
Setting Up Your Canva Canvas for a DTF Gang Sheet
A direct-to-film (DTF) gang sheet groups multiple standalone graphics onto a single continuous transfer roll. Instead of ordering individual prints, commercial decorators pack dozens of logos and chest designs onto one layout to slash production overhead. Getting those economics right depends entirely on your initial setup. If you master how to create a gang sheet in Canva with precise physical bounds, you avoid distorted graphics, uneven aspect ratios, and ruined film during mechanical feeding.
Canva lets you build custom artboards in inches, millimeters, centimeters, or pixels. Standard commercial wide-format print heads run at 22-inch usable widths. To establish an unyielding foundation for DTF gang sheets, you must lock in your exact physical width before laying down a single vector element.
Calculating Pixel Dimensions for 300 DPI in Canva
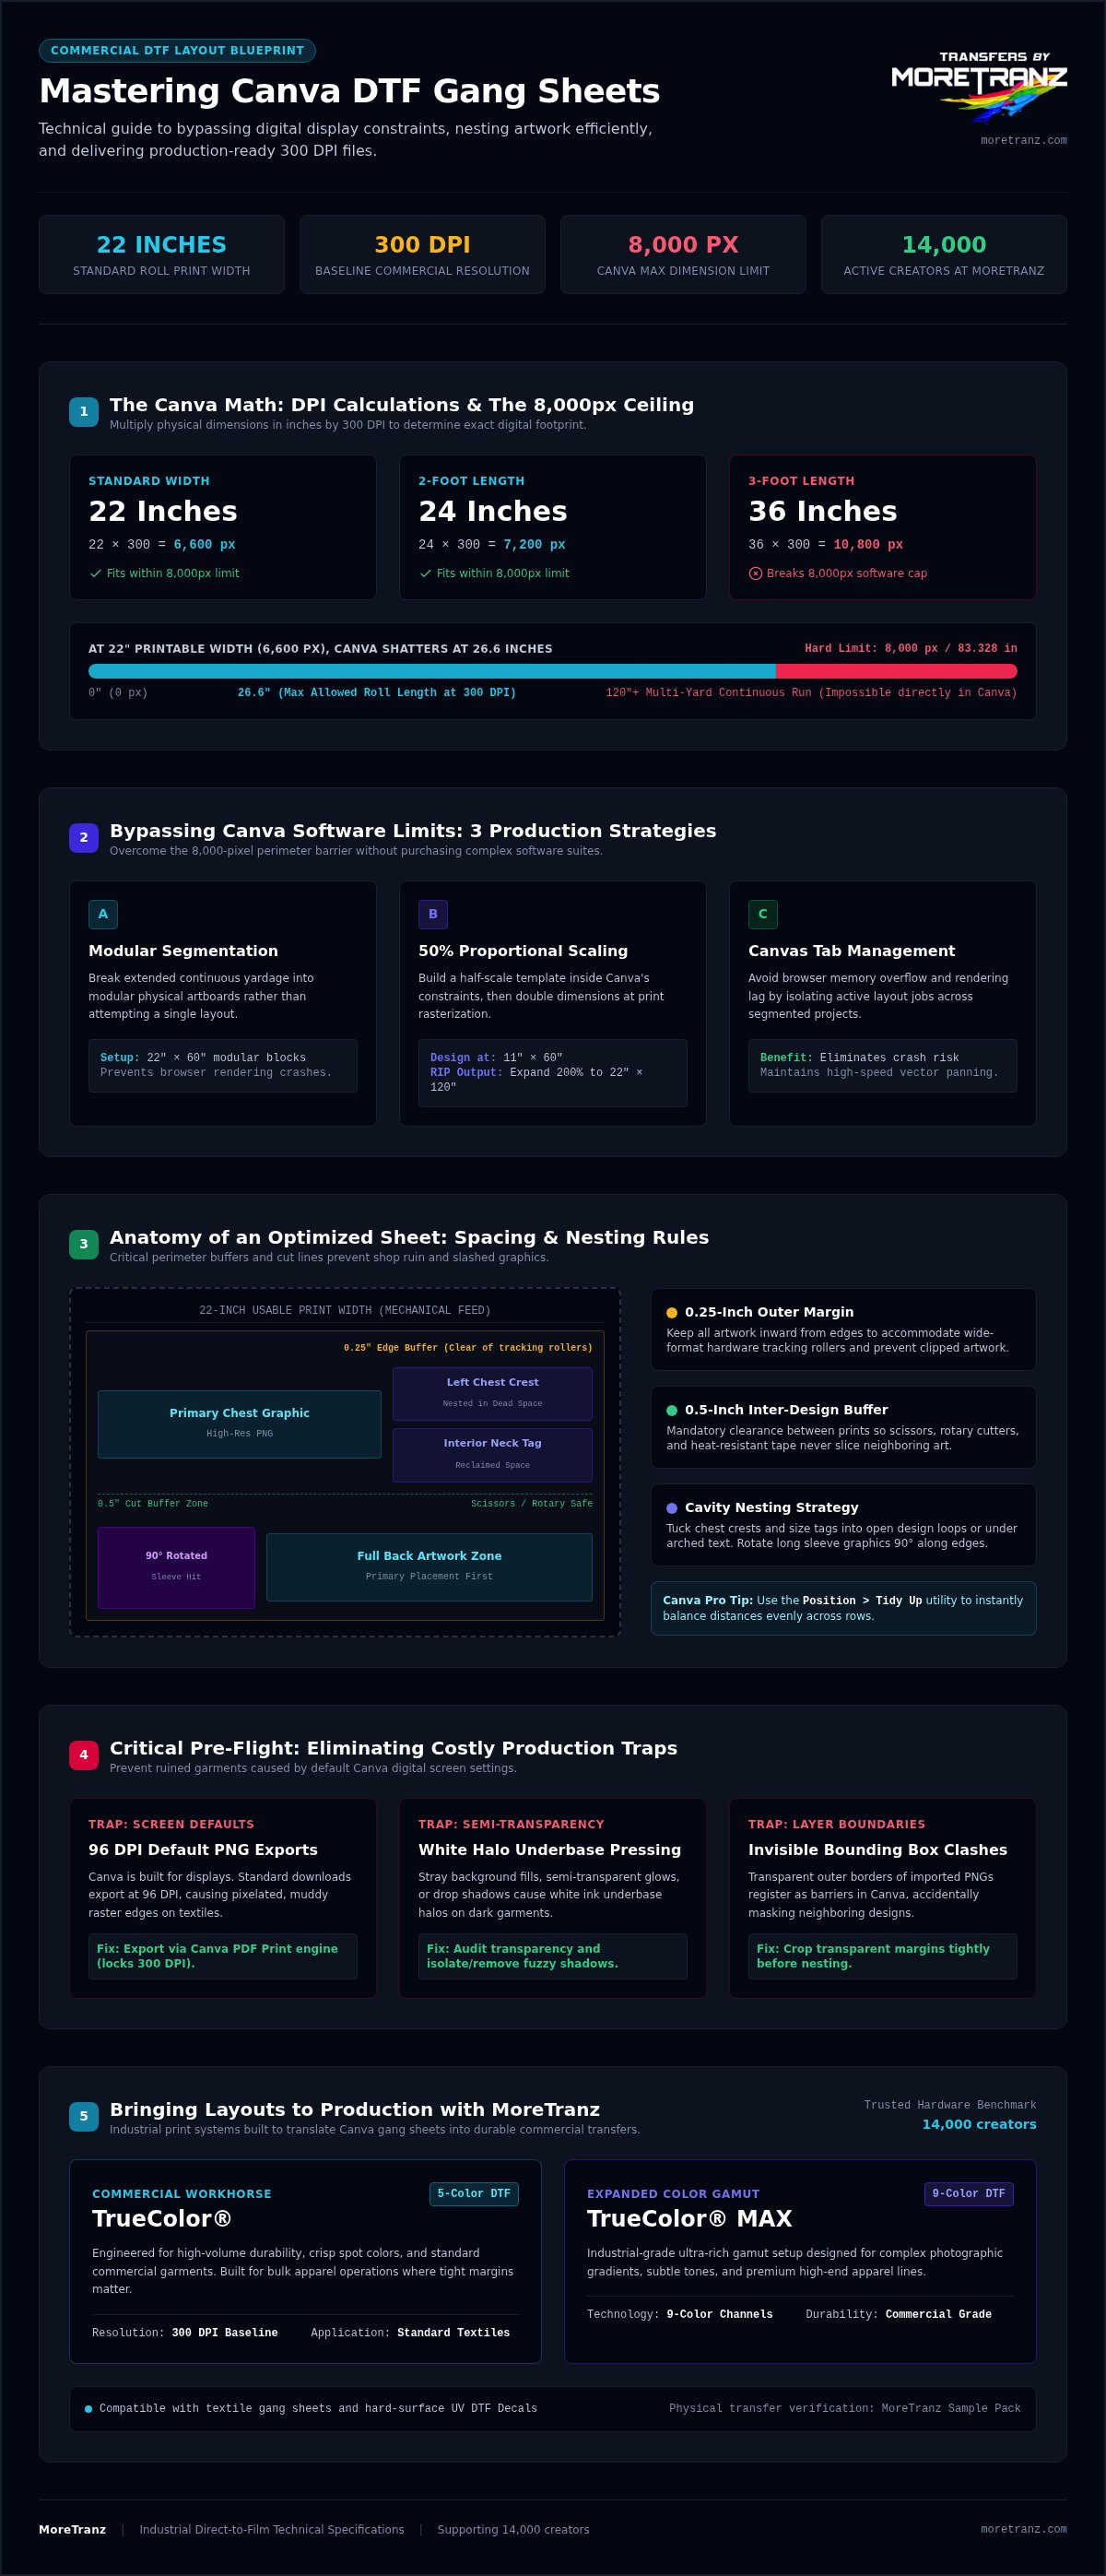
Industrial garment printing demands a baseline resolution of 300 dots per inch (DPI) to output sharp raster detail without muddy edges. To calculate your digital footprint manually, multiply your targeted width and height in inches by 300:
- 22-inch width: 22 × 300 = 6,600 pixels
- 24-inch length: 24 × 300 = 7,200 pixels
- 36-inch length: 36 × 300 = 10,800 pixels
Selecting inches directly inside Canva's custom size dropdown establishes your aspect ratio immediately. If your raster files already maintain high pixel densities, entering inches keeps your digital bounding box aligned with real-world print mechanics.
Navigating Canva's Maximum Canvas Size Limitations
Here is where most creators hit a brick wall when learning how to create a gang sheet in Canva. Canva enforces a strict ceiling on its custom artboards: no dimension can exceed 8,000 pixels or 83.328 inches. That hard barrier breaks continuous multi-yard workflow setups. At a true 300 DPI target (6,600 pixels wide), any roll longer than 26.6 inches mathematically shatters Canva's 8,000-pixel perimeter rule.
Bypass this restriction with a modular production workflow:
- Segment long yardage: Instead of building an impossible 120-inch file, configure modular sheets such as 22 × 60 inches.
- Build proportional templates: If you must submit a single massive layout, design your canvas at exactly 50% scale (for example, 11 × 60 inches to output a 22 × 120-inch sheet) and have your print facility expand the asset 200% at the RIP software stage.
- Prevent browser failure: Stacking modular canvases rather than overloading a single giant browser tab prevents rendering lag and costly memory crashes.
Arranging Artwork Efficiently to Maximize Sheet Space
Nesting designs tightly drives down production expenses immediately. When learning how to create a gang sheet in Canva, every square inch of unused transfer film represents wasted capital. Populate your layout using strictly high-resolution PNGs with transparent backgrounds. Organize incoming artwork by application zones, placing large front-chest prints alongside back graphics first, then filling gaps with sleeve hits and interior neck labels. Keep all imagery safely inside your page perimeter to prevent edge clipping during wide-format print feeding.
Positioning and Spacing Graphics to Avoid Cut Errors
Cramming elements without cutting buffers causes costly shop disasters. Maintain a strict 0.5-inch safety buffer between individual transfer designs so scissors, rotary cutters, and heat-resistant application tape never slice neighboring art. Keep all critical print elements at least 0.25 inches inward from the outer sheet edge to accommodate tracking rollers. Select multiple elements and engage Canva's Position menu, using the Tidy Up utility to balance distances evenly across horizontal or vertical rows.
Nesting Small Logos Inside Open Design Cavities
Large graphics naturally leave substantial dead space. Reclaim that lost film by nesting secondary assets directly inside empty cavities:
- Tuck left-chest crests, sleeve bars, and size tags beneath arched text arcs.
- Place hat emblems inside open interior loops of oversized numbers or circular badges.
- Rotate horizontal sleeve prints 90 degrees to fill vertical margins along sheet edges.
Strategic nesting turns dead negative space into revenue-generating prints. If you want to benchmark how tight nests translate to physical substrates, test your placement accuracy first with a MoreTranz Sample Pack before running production rolls.
Managing Layer Overlaps and Invisible Bounding Boxes
Invisible canvas traps destroy seemingly pristine exports. Transparent margins around PNG imports still register as physical barriers inside Canva. When large invisible bounding boxes overlap adjacent graphics, the rendering engine can unintentionally mask or crop fine details underneath.
Pull cropping handles tightly against the visible pixels of every imported asset before locking in its position. Open the Layers panel under the Position tool to inspect your graphic stack, ensuring small nested logos sit on top of larger shapes. Lock completed clusters immediately to prevent accidental movement as you finalize how to create a gang sheet in Canva for output.
Critical Artwork Pre-Flight: Transparency and Resolution Traps
Commercial DTF printing mechanics operate under strict rules that screen-based software routinely masks. Industrial engines lay down an opaque white ink underbase beneath every single non-transparent pixel. When a graphic contains semi-transparent elements, the RIP software reads those pixels as positive coverage and floods them with white underbase ink. The result on a black hoodie is an ugly, chalky halo. True mastery of how to create a gang sheet in Canva requires aggressive pre-flight screening before sending files to print.
Purging Unwanted Backgrounds and Stray Pixels
White background boxes frequently hide in plain sight against Canva's default white artboard. Temporarily switch your canvas background to high-contrast neon green or hot magenta while assembling designs. This instantly exposes leftover JPEG borders, dirty edges, and stray off-white flecks. If basic eraser tools leave behind ragged pixels, turn to dedicated artwork services for clean edge cleanup. Switch the artboard background back to pure white before proceeding to your final download.
Avoiding Semi-Transparent Gradients and Soft Shadows
Canva's native drop shadow and glow effects look smooth on a monitor, but they ruin apparel prints. Feathered edges create a perimeter of low-opacity pixels. The DTF printer attempts to back these faint pixels with solid white ink, generating a mottled gray or chalky border. Strip away soft drop shadows entirely:
- Use solid strokes: Replace blurred shadows with crisp, vector-style contour lines.
- Lock opacity: If applying a glow effect, push the transparency slider up to 100% to create a solid, hard-edged boundary.
- Eliminate smoke effects: Avoid soft photographic fades unless they are converted into genuine half-tone patterns.
Verifying Resolution at 100 Percent Print Scale
Blowing up low-resolution web graphics across a 22-inch roll ruins print clarity. At standard 150 to 300 DPI requirements, low-density images degrade immediately into blurry, jagged steps. Zoom your browser view to 100% to inspect actual line weights and raster boundaries. If curves appear stair-stepped or text edges show pixel compression fuzz on your screen, that flaw will transfer straight onto your garments. Avoid stretching low-resolution thumbnails; instead, run raster designs through a dedicated Vector Conversion Service to rebuild crisp, scalable paths before locking down your sheet layout.
Exporting Print-Ready Gang Sheets from Canva
Precision layouts mean nothing if your download pipeline degrades raster clarity or reintroduces background artifacts. Locking in the download stage is the final step in discovering how to create a gang sheet in Canva that translates directly to industrial equipment. Head to the top menu bar, click Share in the upper-right corner, and select Download from the dropdown list. From here, picking the wrong format will instantly crush your 300 DPI target down to screen-grade resolution.
Never rely on Canva's default image export settings for apparel transfers. A standard PNG or JPEG download delivers a baseline resolution of just 96 DPI, rendering text fuzzy and geometric boundaries jagged. You need to configure advanced format controls to keep physical print parameters sharp. Always verify the downloaded file size and pixel dimensions on your local drive before uploading it to a commercial queue.
Transparent PNG Export Settings and Canva Pro Workarounds
If your gang sheet consists purely of raster elements, select PNG as your file type. You must check the Transparent background box to purge the canvas backdrop completely; leaving it unchecked yields a solid white block that ruins dark garments. For layouts built at proportional half-scale to bypass canvas bounds, crank the Size slider up to double the pixel count on export. Free Canva users cannot export native transparent backgrounds directly, requiring dedicated external background removal tools before file submission.
Exporting High-Quality PDF Print for Vector Preservation
For gang sheets containing sharp typography, clean linework, or complex geometric layouts, select PDF Print instead of standard image formats. This option bypasses standard web compression and preserves crisp paths without pixel degradation.
- Enable Flatten PDF: Check this box to merge layered elements and transparent overlaps into a stable, single-plane document. This eliminates missing graphics caused by RIP parsing conflicts.
- Select CMYK Profile: If running Canva Pro, switch the color profile from RGB to CMYK. Industrial hardware mixes ink in CMYK, so converting at export aligns on-screen hues closer to cured garment inks.
- Deselect Crop Marks and Bleed: Keep both boxes unchecked. Adding registration marks expands the sheet perimeter unnecessarily and disrupts roll edge tracking during high-speed printing.
Executing these specific export rules completes the process of how to create a gang sheet in Canva with commercial confidence, ensuring your artwork arrives on the production floor exactly as intended.
Bringing Canva Gang Sheets to Life with MoreTranz
Understanding how to create a gang sheet in Canva solves only half the production equation. Digital precision means little without an industrial-grade print engine capable of executing fine line weights and intense color saturation. Transfers by MoreTranz bridges that gap, translating your Canva layouts into durable heat transfers built for commercial apparel decoration. Over 14,000 creators nationwide trust Transfers by MoreTranz to power their production lines. With no minimum order requirements, you can run prototype runs or scale up to massive rolls backed by rapid nationwide fulfillment.
Selecting TrueColor® vs TrueColor® MAX for Your Gang Sheet
Choosing the correct transfer formulation determines how your Canva graphics translate from the screen to the fabric:
- TrueColor® Transfers: Built on a standard 5-color system, this profile delivers crisp, dependable reproduction for corporate merchandise, athletic logos, and solid vector palettes.
- TrueColor® MAX Transfers: Engineered with an expanded 9-color ink architecture that adds red, green, blue, and orange to standard process inks. This proprietary process captures challenging photographic gradients, lifelike skin tones, and ultra-vivid hues that standard 5-color setups cannot replicate.
- Specialty Transfer Options: Expand past standard garments by leveraging hard-surface UV DTF Decals or high-shimmer spangle transfers to diversify your finished product offerings.
Streamlined Verification and Ordering Without Setup Hassles
Submitting your file takes seconds. Once you export your print-ready PNG or PDF, upload the file directly to the Transfers by MoreTranz online portal. Our production prep team inspects your artwork before laying ink on film, checking for transparent boundary traps and scale errors.
If your Canva file needs resolution enhancement or border cleanup, our team offers professional artwork support and dedicated vector conversion services to optimize your files for print. Put our print clarity to the test risk-free by claiming our free sample pack today.
Scale Your Production with Flawless Gang Sheets
Learning how to create a gang sheet in Canva gives you the tools to bypass standard software limits, eliminate dirty white underbase halos, and maximize every linear inch of transfer film. Conducting strict pre-flight checks and exporting flattened 300 DPI files ensures your digital artboards translate seamlessly into commercial print runs without unexpected press errors.
MoreTranz provides the industrial muscle to bring those digital canvases to life. Trusted by over 14,000 creators, we back your apparel production with zero minimum order requirements and rapid nationwide delivery. Choose dependable TrueColor® transfers for your daily athletic runs, or step up to proprietary TrueColor® MAX 9-color technology to capture unmatched photographic depth, razor-sharp edge definition, and long-lasting wash resilience.
Turn your digital concepts into high-margin apparel today, knowing your transfers will press clean, sharp, and vibrant every single time.
Frequently Asked Questions
Can you make a high-resolution gang sheet in Canva for free?
Yes, you can design and export high-resolution layouts on Canva's free plan, but getting transparency requires an extra step. Free accounts let you build custom inch dimensions and export via PDF Print at 300 DPI. However, native transparent PNG downloads require Canva Pro. Free users must either use a secondary background removal utility or book a professional cleanup service to purge the background before submitting files for production.
What canvas size should I use for a DTF gang sheet in Canva?
Set your canvas width to 22 inches to align directly with standard commercial roll widths. The length depends on your project volume, though Canva caps single artboard dimensions at 83.328 inches. For runs within that limit, input your exact desired length. If your print run exceeds 83 inches, break your artwork into modular segments, like two 22 by 60-inch files, to keep rendering smooth and avoid browser crashes.
Why is my Canva gang sheet blurry when printed?
Your sheet prints blurry because standard Canva image downloads default to a web-level 96 DPI, which is far too low for garment printing. Industrial DTF hardware requires a baseline of 150 to 300 DPI to reproduce sharp detail. Low-resolution imported graphics also pixelate when scaled up. Always inspect assets at full zoom and export using the PDF Print setting to lock in 300 DPI output across your graphics.
How do I make sure my Canva gang sheet background is transparent?
Ensure transparency by downloading your layout as a PNG and checking the Transparent background box in Canva Pro. Before exporting, switch the canvas background to neon green or bright pink to inspect your layout. This high-contrast test immediately exposes hidden white bounding boxes around imported elements. Once you confirm edges are clean, reset the canvas background to pure white and export so the printer applies underbase ink only where intended.
Should I export my gang sheet as a PNG or PDF Print from Canva?
Export as a PDF Print if your layout contains vector shapes, text elements, or fine line work. PDF Print preserves path clarity and locks in 300 DPI resolution without compression artifacts. Use PNG with a transparent background if your file contains only pre-rasterized graphics. If you are learning how to create a gang sheet in Canva with mixed assets, PDF Print with the Flatten PDF option enabled provides optimal RIP stability.
Can I build gang sheets for UV DTF Decals in Canva?
How much space should I leave between designs on a gang sheet?
Leave at least 0.5 inches of empty space between adjacent graphics across your sheet. This margin allows production teams to cut apart transfers with scissors or rotary blades without damaging neighboring prints. It also provides clearance for heat tape during garment alignment. When perfecting how to create a gang sheet in Canva, keep all designs at least 0.25 inches away from outer roll margins to avoid mechanical feed tracking errors.