


How to Use a Heat Press Pillow for DTF: Pro Pressing Guide
A single thick hoodie seam or metal zipper can instantly drop your local pressing pressure to near 0 PSI, ruining an otherwise flawless transfer before it ever ships. If you have watched your film peel around a pocket or fought inconsistent adhesive melt near a collar, you know how frustrating uneven platen contact can be. Mastering how to use a heat press pillow for DTF is the definitive solution to eliminate these pressure dead zones, absorb bulky garment obstacles, and stop wasting premium blanks.
You already know that proper temperature and dwell time matter, but calibrated pressure balance is what truly drives hot-melt adhesive deep into textile fibers. This professional pressing guide gives you the exact blueprint to equalize platen force across seams, collars, and zippers. You will learn how to adjust press clearance, compensate for thermal loss, and dial in the correct compression so every DTF transfer delivers smooth, wash-durable adhesion on every single cycle.
Key Takeaways
- Sink heavy garment obstructions like hoodie pockets, collars, and zippers into a flexible foam core to eradicate pressure drop-offs.
- Master the exact operational steps for how to use a heat press pillow for DTF to achieve uniform adhesive contact on complex apparel.
- Distinguish between PTFE-jacketed pillows, dense silicone foam pads, and standard rubber mats to match the right tool to your fabric density.
- Dial in machine clearance and account for foam thermal absorption, preventing crushed garment fleece and cold-melt failures.
- Troubleshoot edge lifting and uneven peel lines immediately, locking in commercial wash resistance across every production run.
What Is a Heat Press Pillow and Why DTF Transfers Require It
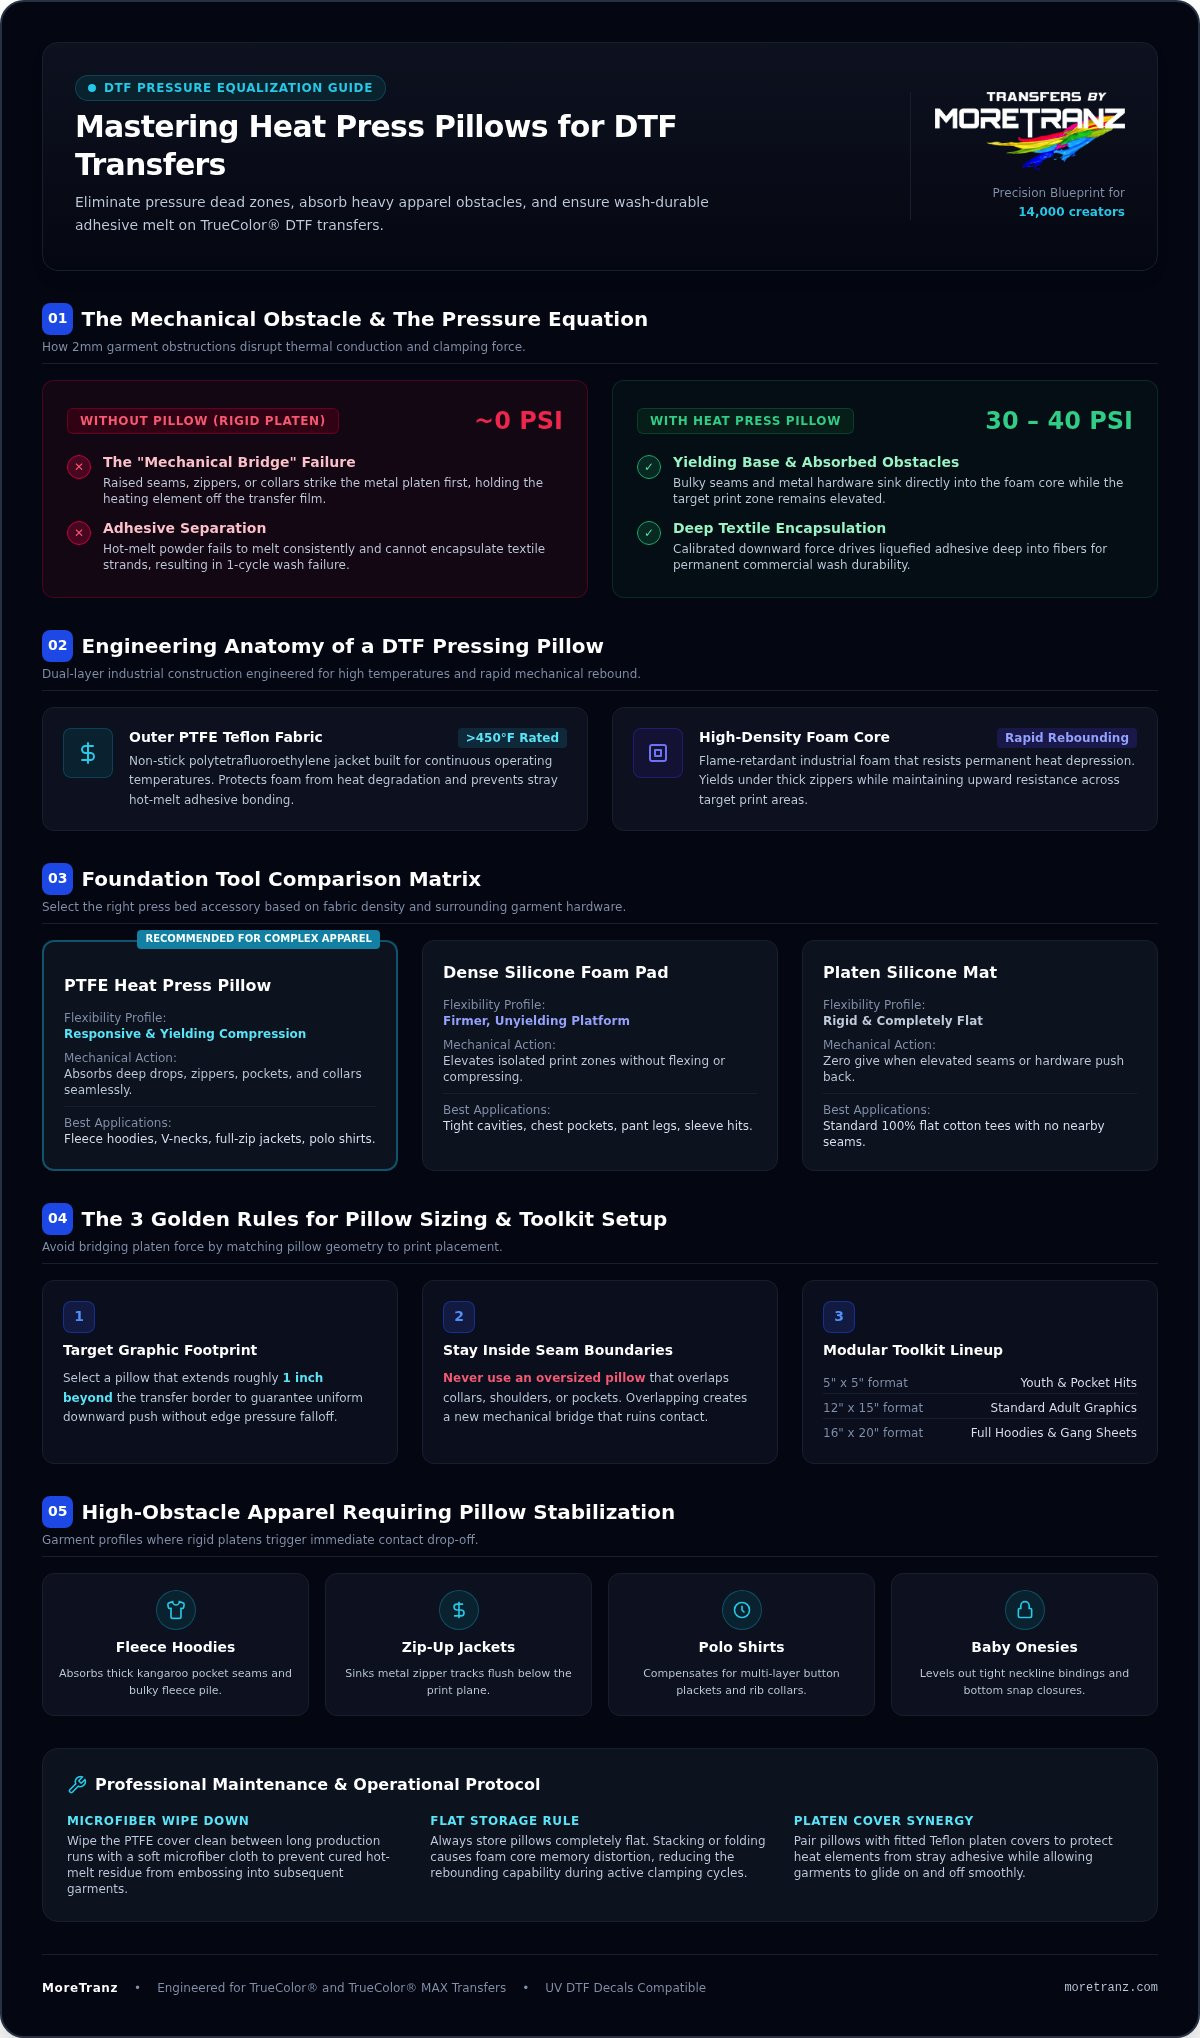
A heat press pillow is an industrial accessory engineered with a high-density, flame-retardant foam core sealed inside heat-resistant PTFE (polytetrafluoroethylene) Teflon fabric. Built to withstand continuous operating temperatures exceeding 450°F, this flexible tool solves a fundamental mechanical challenge in apparel decoration: rigid platens cannot conform to irregular surfaces.
When you close a flat heat press onto a garment, raised seams, thick collars, buttons, and zippers strike the metal platen first. This creates a mechanical bridge that lifts the heating element away from your transfer film, generating localized dead zones of near-zero pressure. Direct-to-film printing requires continuous downward force, typically 30 to 40 PSI, to drive liquefied hot-melt adhesive powder deep into the textile weave. Without uniform contact, the adhesive fails to encapsulate the fabric strands, leaving your graphic vulnerable to peeling. Garments like fleece hoodies with kangaroo pockets, zip-up jackets, polo shirts, and baby onesies demand pillow stabilization to protect print integrity.
The Mechanical Function of Heat Press Pillows
Pillows alter the mechanics of your press bed by creating a dynamic, yielding base. When the upper platen clamps down, bulky seams and metal zippers sink directly into the high-density foam core. Meanwhile, the flat target print zone remains elevated, receiving direct, concentrated downward force. Commercial-grade foam features rapid rebounding properties, resisting permanent heat depression and ensuring consistent pressure across back-to-back production cycles.
Why Seams, Collars, and Zippers Ruin DTF Applications
A single collar seam just two millimeters thick can prop open a rigid press platen. This slight elevation starves the transfer film of direct thermal conduction and clamping energy. The hot-melt powder melts inconsistently, resulting in weak chemical bonding and inevitable wash-out failure after a single laundry cycle.
Industrial applications built on TrueColor® DTF transfers rely on unbroken surface contact to guarantee complete adhesive liquefaction and vibrant color saturation. Learning how to use a heat press pillow for DTF ensures that bulky garment construction never disrupts your mechanical pressure, protecting the wash-durable finish of every graphic.
Heat Press Pillows vs. Pressing Foam vs. Silicone Mats
Every apparel decorator eventually asks which foundation tool delivers the most reliable transfer bond. Standard silicone mats mounted directly to your lower platen provide a rigid, flat surface. While that works for flat cotton tees, it provides zero give when elevated seams push back. High-density bare silicone foam pads offer firmer resistance, elevating isolated print zones like chest pockets or pant legs without flexing. In contrast, PTFE-coated pillows offer responsive, yielding compression that absorbs heavy hardware while letting the transfer seat cleanly against the garment.
Comparing Pillows, High-Density Foam, and Lower Platen Covers
Selecting the right accessory depends entirely on the thickness of your substrate and the surrounding obstacles. Flexible pillows excel on fleece hoodies, v-necks, and zippered jackets where deep fabric drops occur. Dense, unjacketed foam blocks serve best when you need an unyielding, elevated platform inside tight cavities like zippered pockets. For shop-wide efficiency, pairing these accessories with fitted teflon platen covers protects your machine platens from stray adhesive residue while allowing garments to slide on and off the press bed effortlessly.
Selecting the Correct Pillow Size for Your Garment
Choosing the correct dimension determines whether your press equalizes pressure or introduces fresh mechanical flaws. Follow these core guidelines when setting up your station:
- Target the graphic footprint: Pick a pillow that extends roughly one inch beyond the border of your transfer. This guarantees the entire graphic receives uniform downward push without edge falloff.
- Stay inside the seam boundaries: Never use an oversized pillow that rests over collars, shoulder seams, or kangaroo pockets. Overlapping thick seams defeats the purpose by bridging the platen once again.
- Maintain a modular toolkit: Keep standard sizes on hand, ranging from 5" x 5" squares for youth apparel and pocket hits to 12" x 15" or 16" x 20" formats for full-front hoodies and gang sheet layouts.
Proper maintenance protects your investment. Wipe the PTFE cover clean between long runs with a soft microfiber cloth to prevent cured hot-melt residue from embossing into your next garment. Storing pillows flat preserves the internal open-cell foam structure. When evaluating how to use a heat press pillow for DTF across tricky blends, test your parameters first with a MoreTranz sample pack to lock in clean peel mechanics before starting bulk runs.
Step-by-Step: How to Use a Heat Press Pillow for DTF Transfers
Executing a clean transfer on complex garments requires systematic mechanical setup. Adding thickness to your lower press platen changes how your press locks down. Following a strict sequence for how to use a heat press pillow for DTF prevents damaged garments, blown press joints, and ruined prints. For detailed heat ratings and dwell benchmarks across different fabrics, consult the MoreTranz instructions guide before setting up your workstation.
Step 1: Inserting and Aligning the Pillow
Open all closures first. Unzip full-zip jackets completely and unbutton polos down through the placket. Slide the pillow directly inside the garment cavity, positioning it under the intended graphic zone.
Smooth the fabric outward by hand. Ensure heavy seams, collar bands, and metal zipper teeth drape completely off the perimeter edges of the pillow. The target print zone must rest dead center on the raised cushion while the bulky hardware drops below the pressing plane.
Step 2: Recalibrating Clamping Pressure
Because the foam adds significant height to your lower platen, clamping down without adjusting your machine can crack the linkage arms. Back off the pressure adjustment knob by several full turns before closing the press.
Lock the press empty over the pillow during a dry run to gauge resistance. Calibrate the clamping action until you achieve medium-firm resistance, targeting roughly 60% compression of the foam core. Run a quick paper drag test by sliding standard paper under each corner of the platen. If the paper pulls out freely, increase the pressure slightly until the platen clamps with parallel downward bite.
Step 3: Pressing, Cooling, and Peeling
Once calibrated, position your TrueColor MAX DTF Transfers film directly onto the elevated print zone. The specialized 9-color pigment laydown demands uniform thermal penetration to cure the hot-melt backing completely. Cover your transfer with a protective sheet and lock down the press for the full cycle. After opening the press, allow the garment to cool according to the film peel specifications before peeling the carrier film away in a single, smooth pull.
Pressure and Temperature Adjustments When Using Pillows
Foam acts as an insulator, which introduces a critical thermal dynamic into your press workflow. When you clamp cold foam beneath a garment, the core acts as a temporary heat sink, pulling thermal energy away from the upper platen. A mandatory 5 to 10-second pre-press solves this immediately. Pre-pressing purges residual moisture trapped deep within heavy textiles while simultaneously warming the foam core, ensuring the platen maintains continuous heat delivery throughout the actual press cycle.
Foam compression physics directly determine the visual quality of the garment finish. Keep pillow compression dialed strictly between 60% and 70% of resting thickness. Clamping beyond 70% collapses the internal cell matrix and leaves ugly, permanent indentation boxes on heavy fleece. Under-compressing fails to deliver the target 30 to 40 PSI necessary to fuse hot-melt adhesive into fabric weaves.
Compensating for Heat Absorption and Dwell Time
Because the interior foam draws heat away from the bond line, standard recipes may leave adhesive partially unmelted. Compensate by extending your press dwell time by 2 to 3 seconds, or boost upper platen heat by 5°F to 10°F. Always verify thermal uniformity across the pressing zone with a digital infrared thermometer. Understanding how to use a heat press pillow for DTF means calibrating this thermal offset before committing to volume runs.
Fabric-Specific Configurations: Polos, Hoodies, and Jackets
Different apparel builds demand precise physical staging to protect seams and lock in adhesive bonds:
- Fleece Hoodies: Set your heat press between 300°F and 320°F. Center the pillow precisely between the kangaroo pocket edge and the collar seam to insulate the print area while preventing flattened fleece pile.
- Polo Shirts: Position the top edge of the pillow just beneath the bottom placket stitch. This allows rigid plastic buttons to hang below the pressing plane, preventing platen deflection.
- Zipped Outerwear and Nylons: Dial temperatures back to 280°F to 295°F to avoid scorching synthetic shells. Align the pillow edge flush against the zipper track so teeth hang freely without absorbing mechanical force.
Troubleshooting Common Mistakes and Ensuring Flawless Adhesion
Press errors waste inventory and derail production schedules. Even experienced print shops encounter edge lifting, ghosting, or unsightly surface sheen when adapting to padded platens. Resolving these defects requires isolating mechanical positioning from adhesive curing dynamics. Understanding how to use a heat press pillow for DTF means diagnosing root causes immediately to maintain uninterrupted production runs.
Diagnosing Lifting Edges, Under-Cured Powder, and Ghosting
When transfer film peels unevenly or pulls up along outer margins, check your pillow placement. Lifting edges almost always trace back to an undersized pillow or an errant seam overlapping the cushion perimeter. If a hoodie collar seam rests across the pillow edge, it props up the upper platen, starving adjacent artwork of mechanical bite.
Target these proven fixes for recurring pressing errors:
- Ghosting and Carrier Drift: Foam cores naturally expand slightly as the press opens. This sudden decompression can jolt an unanchored transfer sheet while the adhesive remains molten. Lock your carrier film down using thermal tape to prevent blurred graphics.
- Under-Cured Adhesive: If powder looks grainy or flakes off instead of setting into an elastic, solid film, your dwell time failed to overcome foam thermal absorption. Increase your cycle by 3 seconds or run a longer pre-press cycle.
- Glossy Seam Rings: Over-compressing foam drives fabric borders hard into the upper heat plate. Ease off the clamping dial until the press closes smoothly without pinching the surrounding textile.
Always execute a quick post-press finishing step. After peeling away the carrier film, lay a sheet of parchment paper over the bare transfer and press for another five seconds. This final hit pushes liquefied adhesive fibers deep into textile grooves, removing plastic sheen and delivering an ultra-soft matte texture.
Upgrading Print Consistency with Industrial Transfer Quality
Flawless application requires engineered raw materials. Inferior transfer films and low-grade adhesive powders struggle when garment topography introduces minor elevation shifts. MoreTranz manufactures high-density transfers engineered with industrial polyurethane powders that melt uniformly across variable fabric textures.
More than 14,000 creators nationwide rely on MoreTranz transfers to power their commercial apparel shops with zero misprints. Elevate your production speed and evaluate these durable formulations by ordering a free sample pack today.
Lock in Zero-Defect Production on Every Order
Mastering how to use a heat press pillow for DTF transforms complex apparel blanks into reliable, high-margin inventory. Sinking bulky seams and metal zippers beneath the pressing plane, calibrating machine clearance to avoid crushed fabric textures, and pre-pressing to overcome foam thermal absorption permanently eliminates edge lifting. You protect your blanks and ensure total adhesive liquefaction across every production cycle.
Precision mechanical setup reaches its full potential when paired with industrial-grade materials. More than 14,000 creators nationwide trust MoreTranz to produce retail-ready apparel that withstands repeated laundering. Both TrueColor® and TrueColor® MAX transfers deliver razor-sharp color saturation alongside industrial-grade hot-melt adhesive engineered for zero edge lift, keeping your production line moving fast without misprints.
Take full control of your pressing mechanics today, protect your shop margins, and fulfill every customer run with complete confidence.
Frequently Asked Questions
Can you use a heat press pillow for all types of DTF transfers?
Yes, you can use a heat press pillow for all DTF transfers, including standard TrueColor® and high-gamut TrueColor® MAX prints. The pillow simply provides mechanical pressure equalization. As long as you dial in the appropriate heat, dwell time, and compression for your garment blend, using a pillow helps prevent uneven adhesive melting across all transfer styles without affecting print vibrance or chemical bonding.
How do you adjust heat press pressure when using a thick pillow?
Loosen your machine's pressure adjustment dial by several rotations before placing the padded garment on the lower platen. Pillows add substantial stack height, which can over-torque manual press linkages. Close the press in test increments until the foam compresses by roughly 60% to 70%. Learning how to use a heat press pillow for DTF requires verifying this balance with a paper drag test across all four platen corners.
What happens if your heat press pillow is smaller than the DTF transfer?
Your transfer will suffer severe edge lifting and partial wash-out failure. Any portion of the film extending beyond the pillow perimeter receives zero downward clamping force. The platen presses only what the pillow elevates. To prevent ruined apparel, always ensure your pillow dimensions extend at least one inch beyond every edge of your transfer graphic, keeping thick garment seams positioned safely outside that footprint.
Is it necessary to increase temperature when pressing with a foam pillow?
Raising the platen temperature by 5°F to 10°F or extending press dwell time by 2 to 3 seconds is often necessary. The dense internal foam acts as a heat sink, drawing thermal energy away from the adhesive bond line during initial contact. Running a 5 to 10-second pre-press over the garment and pillow warms the core and minimizes the need for drastic temperature adjustments.
How do you prevent heat press pillows from leaving permanent indentations on garments?
Keep platen pressure calibrated so the foam compresses no more than 60% to 70% of its resting thickness. Over-clamping forces the pillow edges into synthetic fibers and crushes delicate fleece pile, leaving visible square perimeter marks. Ensuring the pillow spans slightly larger than the transfer graphic and finishing with a light post-press under parchment paper restores natural fabric texture without leaving permanent indentations.
Can you use an iron with a heat press pillow for DTF application?
No, using a household iron on top of a heat press pillow will not produce commercial-quality results. Understanding how to use a heat press pillow for DTF depends on the continuous downward clamping force of a mechanical press, usually 30 to 40 PSI. Hand irons lack the surface area, rigid stability, and sustained pressure needed to sink seams into the pillow while fusing adhesive powder into fabric strands.
Why are my DTF transfers lifting at the edges even when using a pillow?
Edge lifting usually happens when a thick collar seam or pocket hem accidentally overlaps the edge of your pillow. This lifts the platen slightly, starving adjacent film edges of pressure. It can also stem from under-cured adhesive caused by foam heat absorption, or peeling the transfer before it reaches the specified peel temperature. Check seam clearance and add a few seconds to your press dwell time.